CUSTOM DIY PVC Vocal Booth Frame. Make and Assembly Instructions
Complete vocal booth made with PVC has two major components:
a – sound absorption covers and
b – a frame to support it.
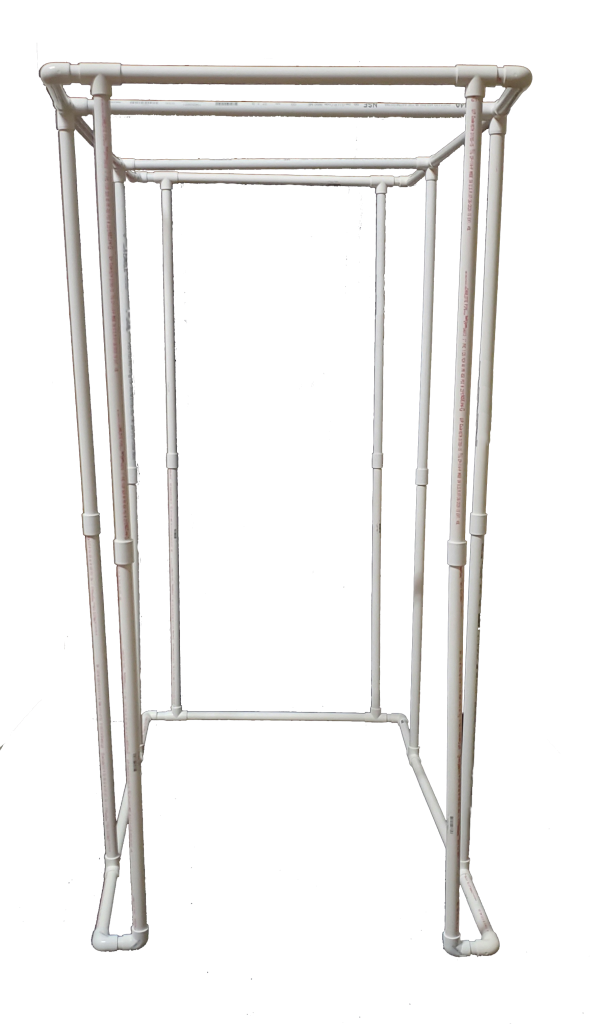
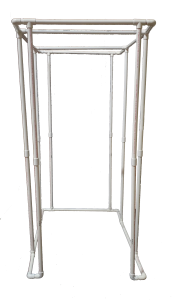
This is what the end result would look like : ===>
PVC pipes and connectors are inexpensive, readily available and easy to work with, this is why the PVC booths are such a popular DIY solution. (If you cannot find the right connectors in your local store – try internet.)
Disadvantage, of course, is that they are “assembly required” so it could be a little time consuming and messy. And with all the appeal it might be a nuisance if you have to record on location often.
PVC Glue. We strongly recommend to glue the pieces together.
(You can try using it without gluing it, of course, but the chance of the frame collapsing on your head is medium to high.)
NOTE: – This calculator works best for frame size between 37 to 78 inches Width and/or Length. If you want the frame size larger that 78W x 78L we strongly recommend to make additional vertical supports. Simply add another set of Vertica pole every 26 inches.
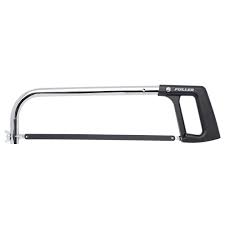
Tools: to cut the pipes you can use a PVC pipe cutter, but it leaves a burr at the cut edges, which makes it very difficult or nearly impossible to fit into the connectors.
So we suggest just a regular hack saw.
(Or wood hand saw with many many small teeth. Hack saw is better. Use hack saw. It will give you a much cleaner cut.)
NOTE: * – To cover the frame we recommend Acoustic Sound Blankets Producer’s Choice. We included suggestions on how to attach the blankets to the frame.


CUT THE PIPES AS FOLLOWS:
To create PVC frame: ” Wide, ” Long and ” Tall
You will need to buy 10′ long PVC pipes, so you have enough material to cut inches total length of all the pipes.
PVC frame pipe cut sizes:
| PVC pipes description | SKU | Quantity | Size (Inches) |
|---|---|---|---|
| Insertion – L (for Length) | In-L | 8 | |
| Center Piece | C-P | 7 | 28 |
| Vertical pole | V1 | 8 | |
| Cross Bar ** | X-B | 2 |
NOTE: ** – We recommend to add cross bars to frames larger than 40 x 40 inches. for smaller frames the cross bars are optional.
Connectors: The following connectors are included:
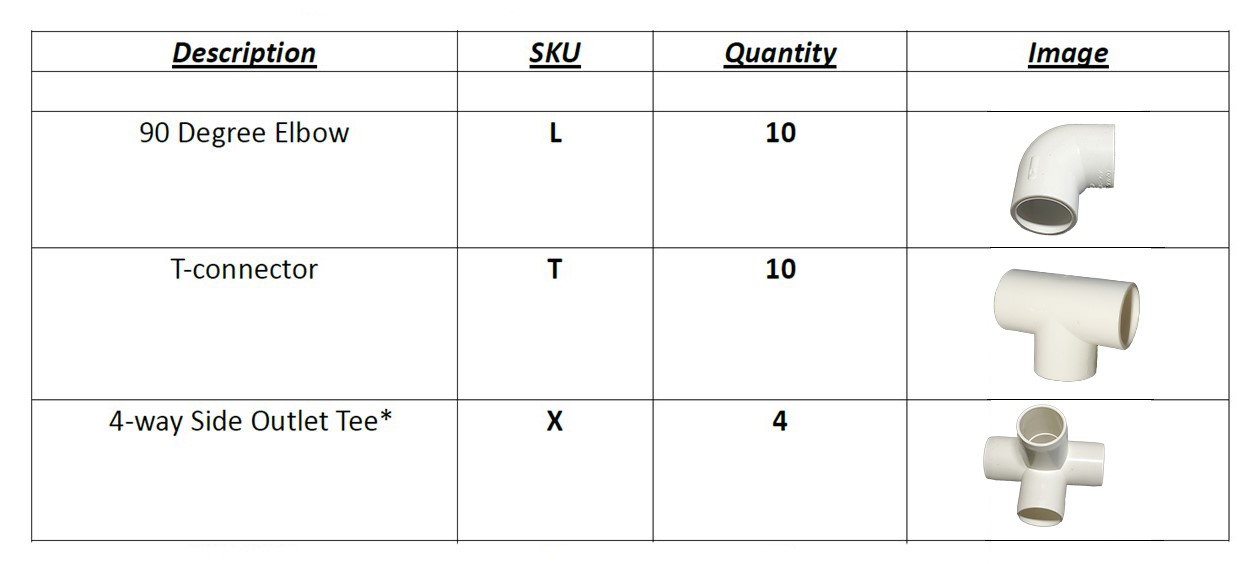
NOTE:
* If you are building a frame that is smaller than 40 x 40 inches, you can replace the 4-way connectors with the T- connectors.
** For smaller frames, like 40 x 40 the top cross bars are not necessary. Cross bars add stability and is a good way to support the roof blanket. (We recommend to use the Cross bars for larger frame size.)
PVC frame pipe cut sizes:
a) Assemble the base frame portion:
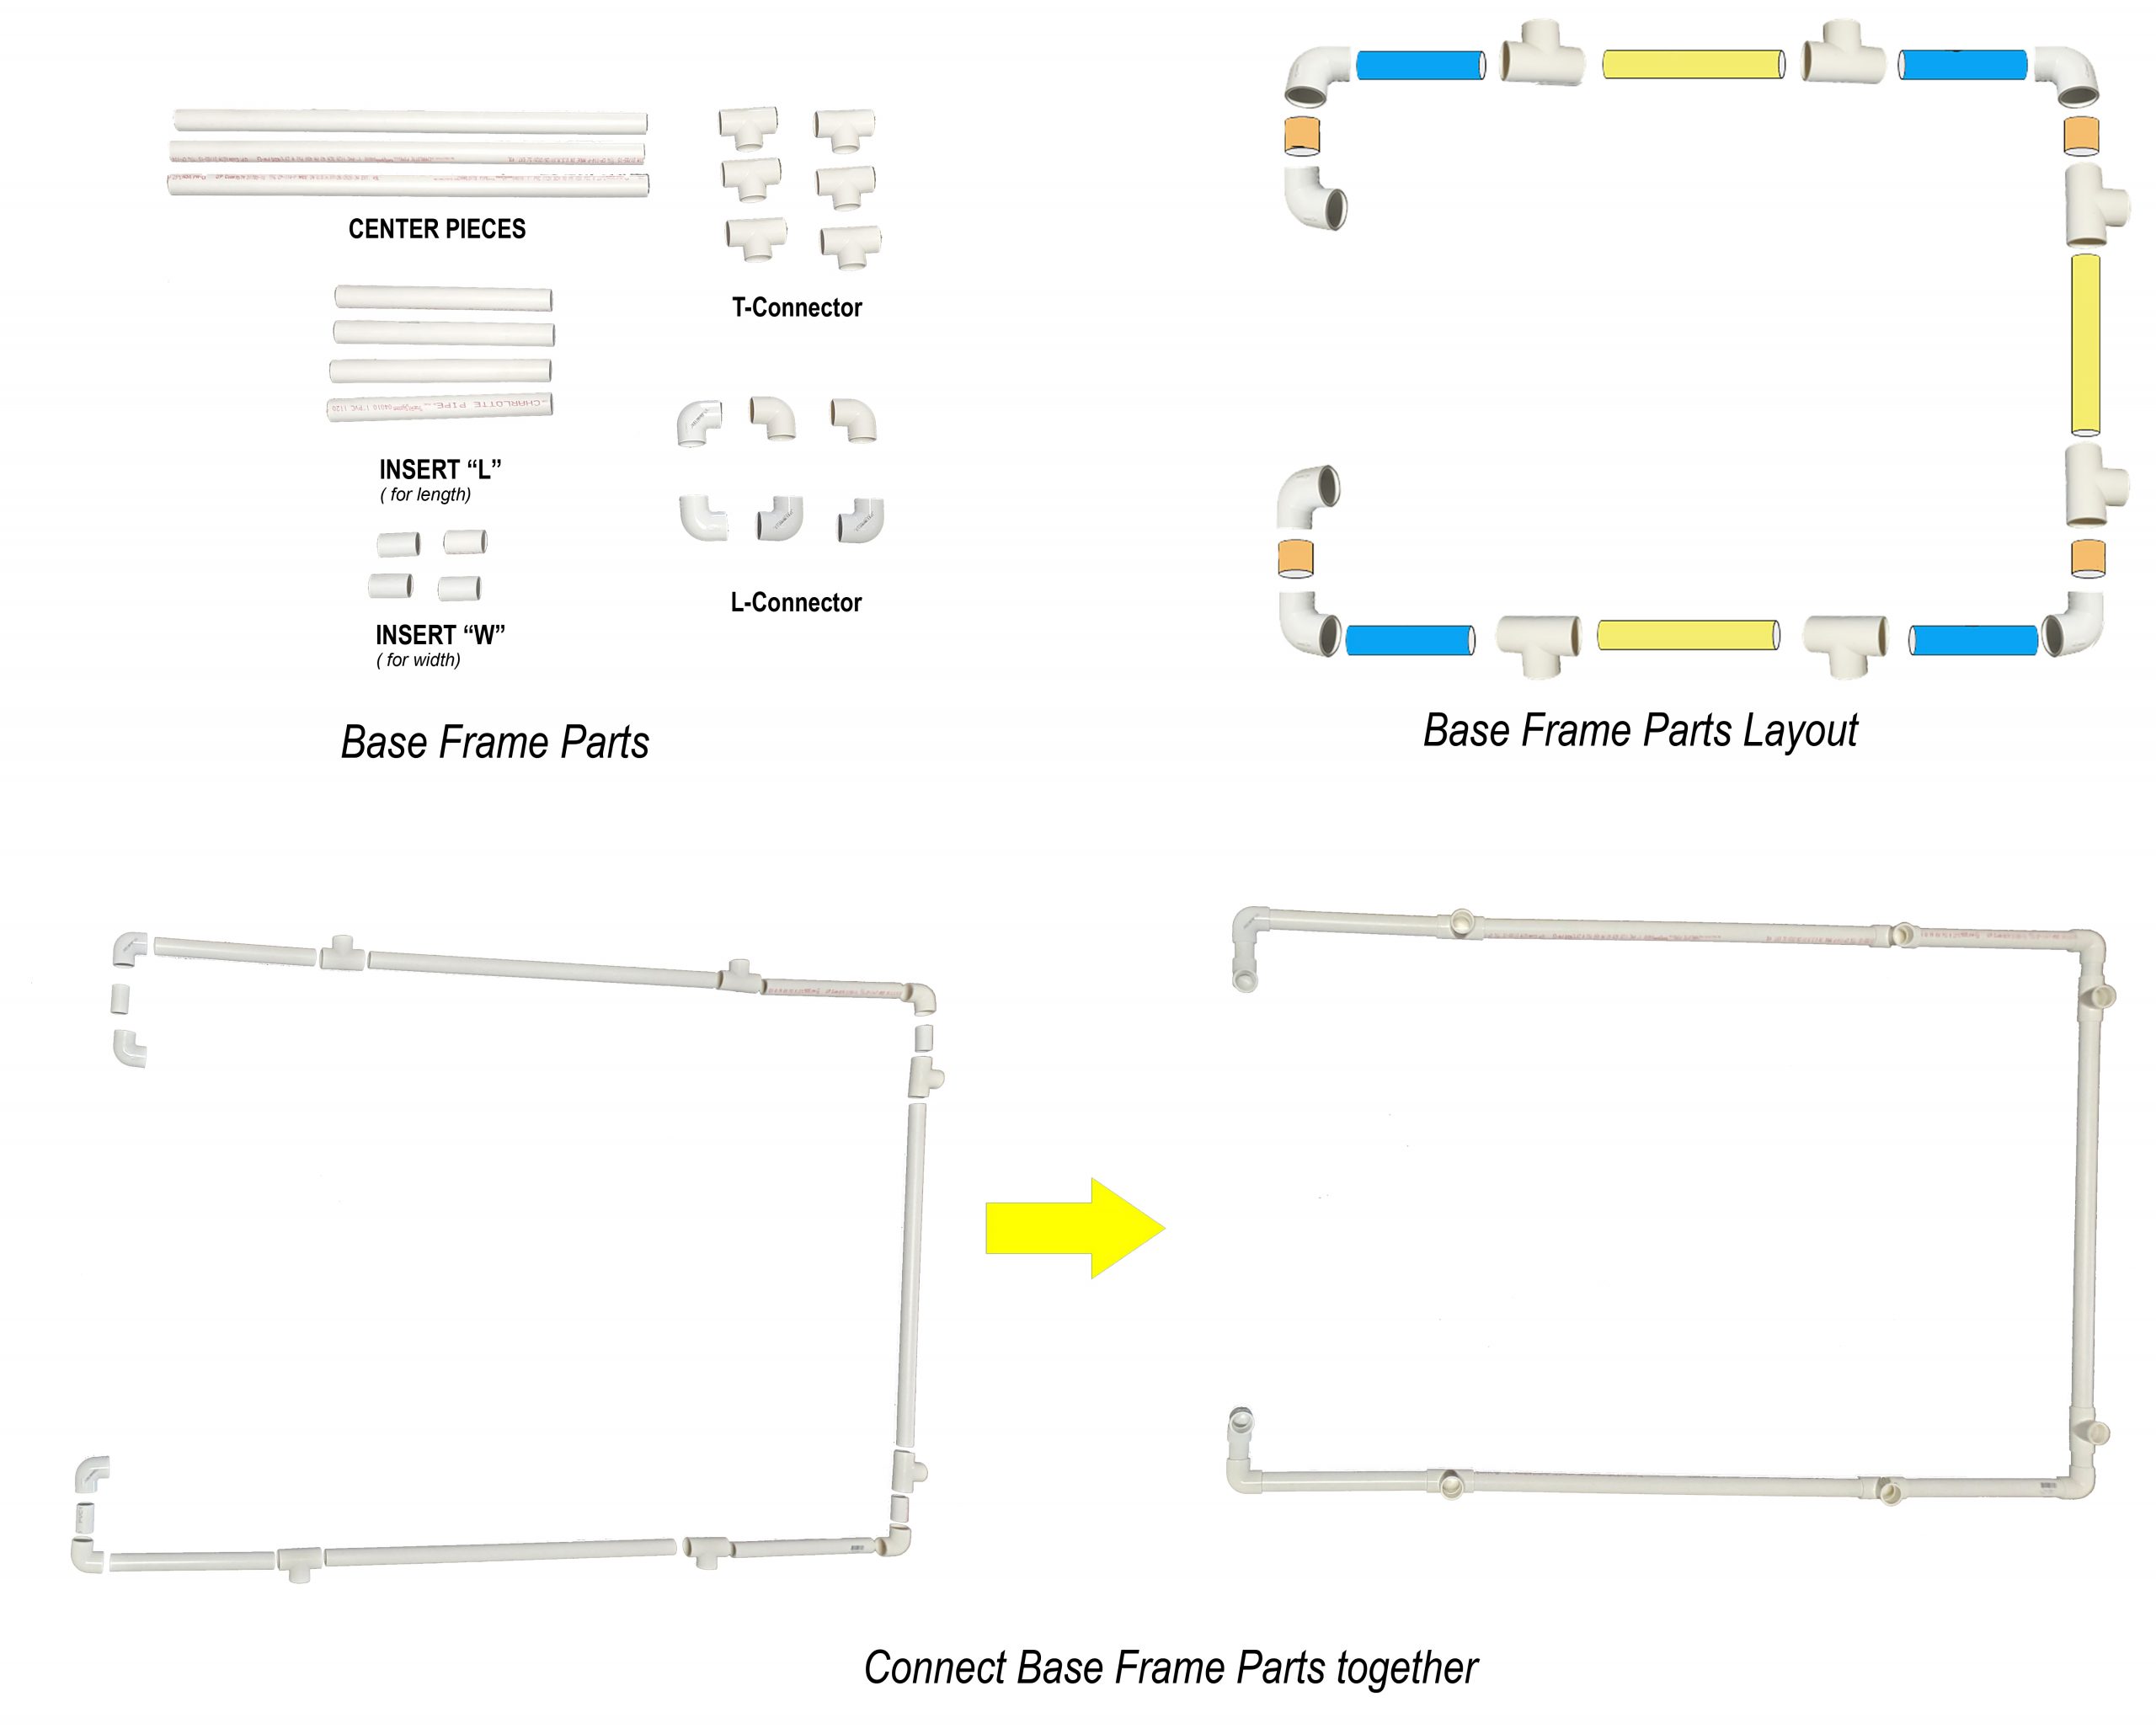
b) Assemble Top frame parts:
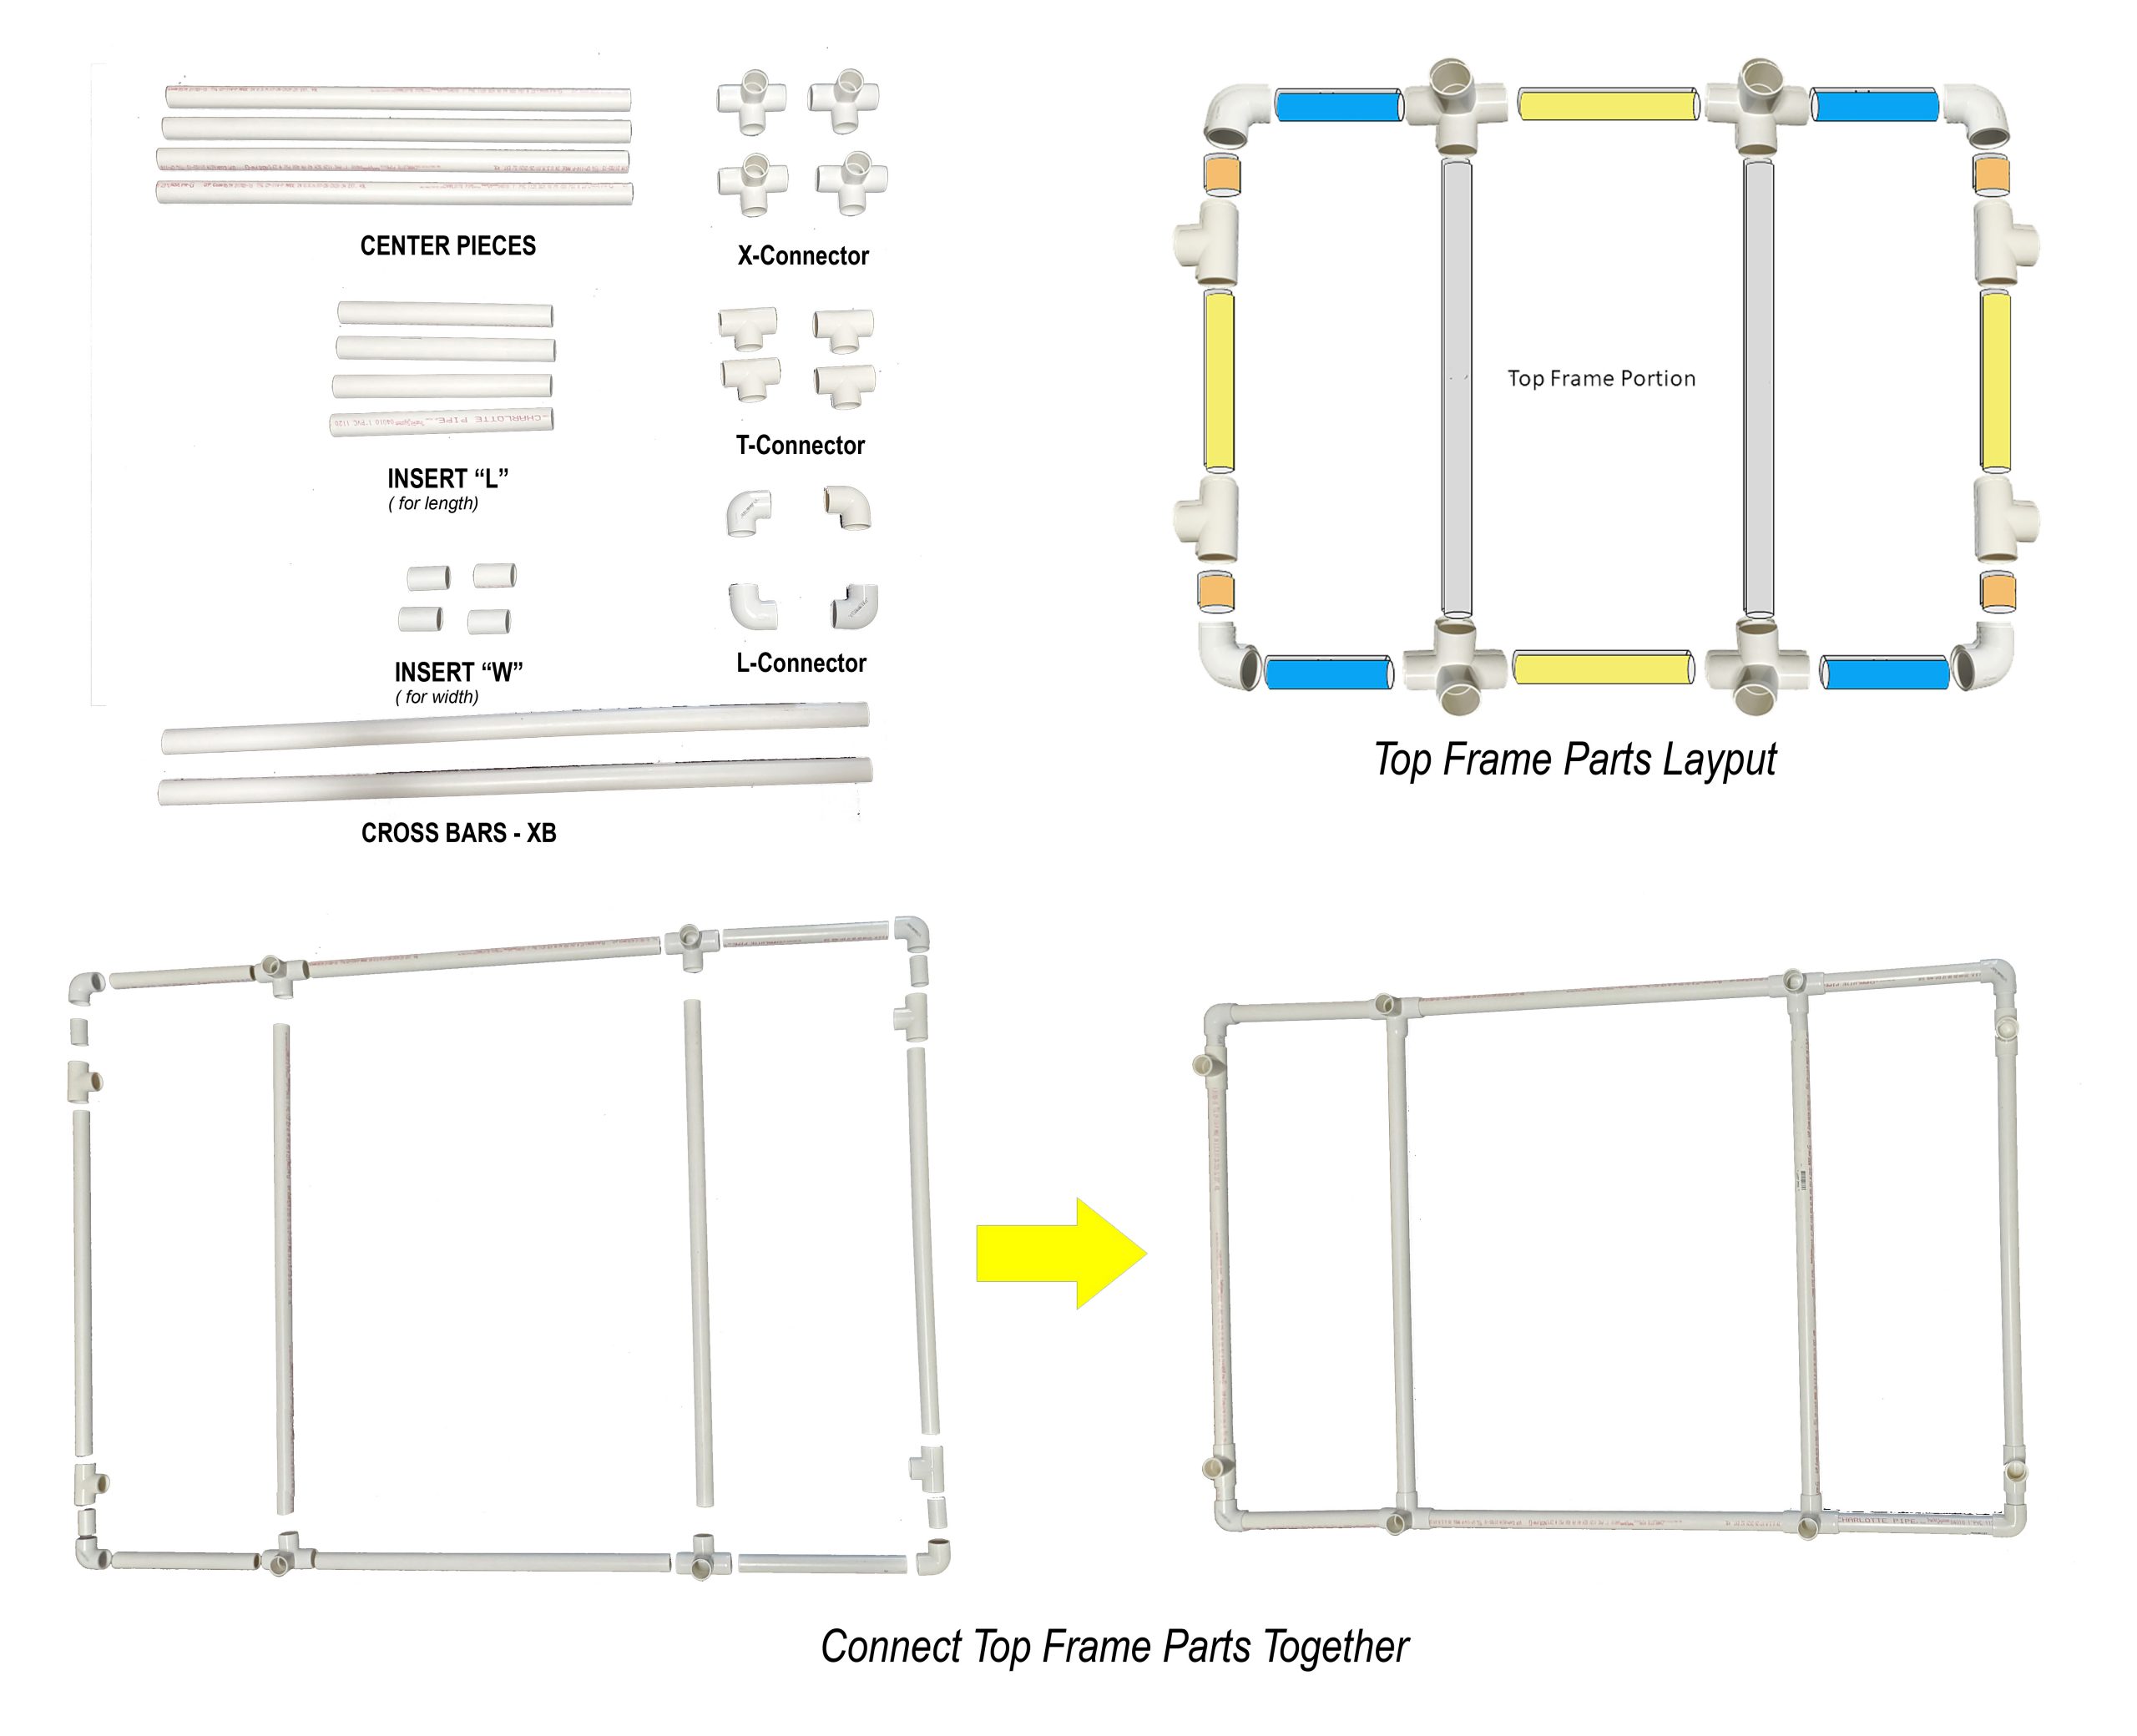
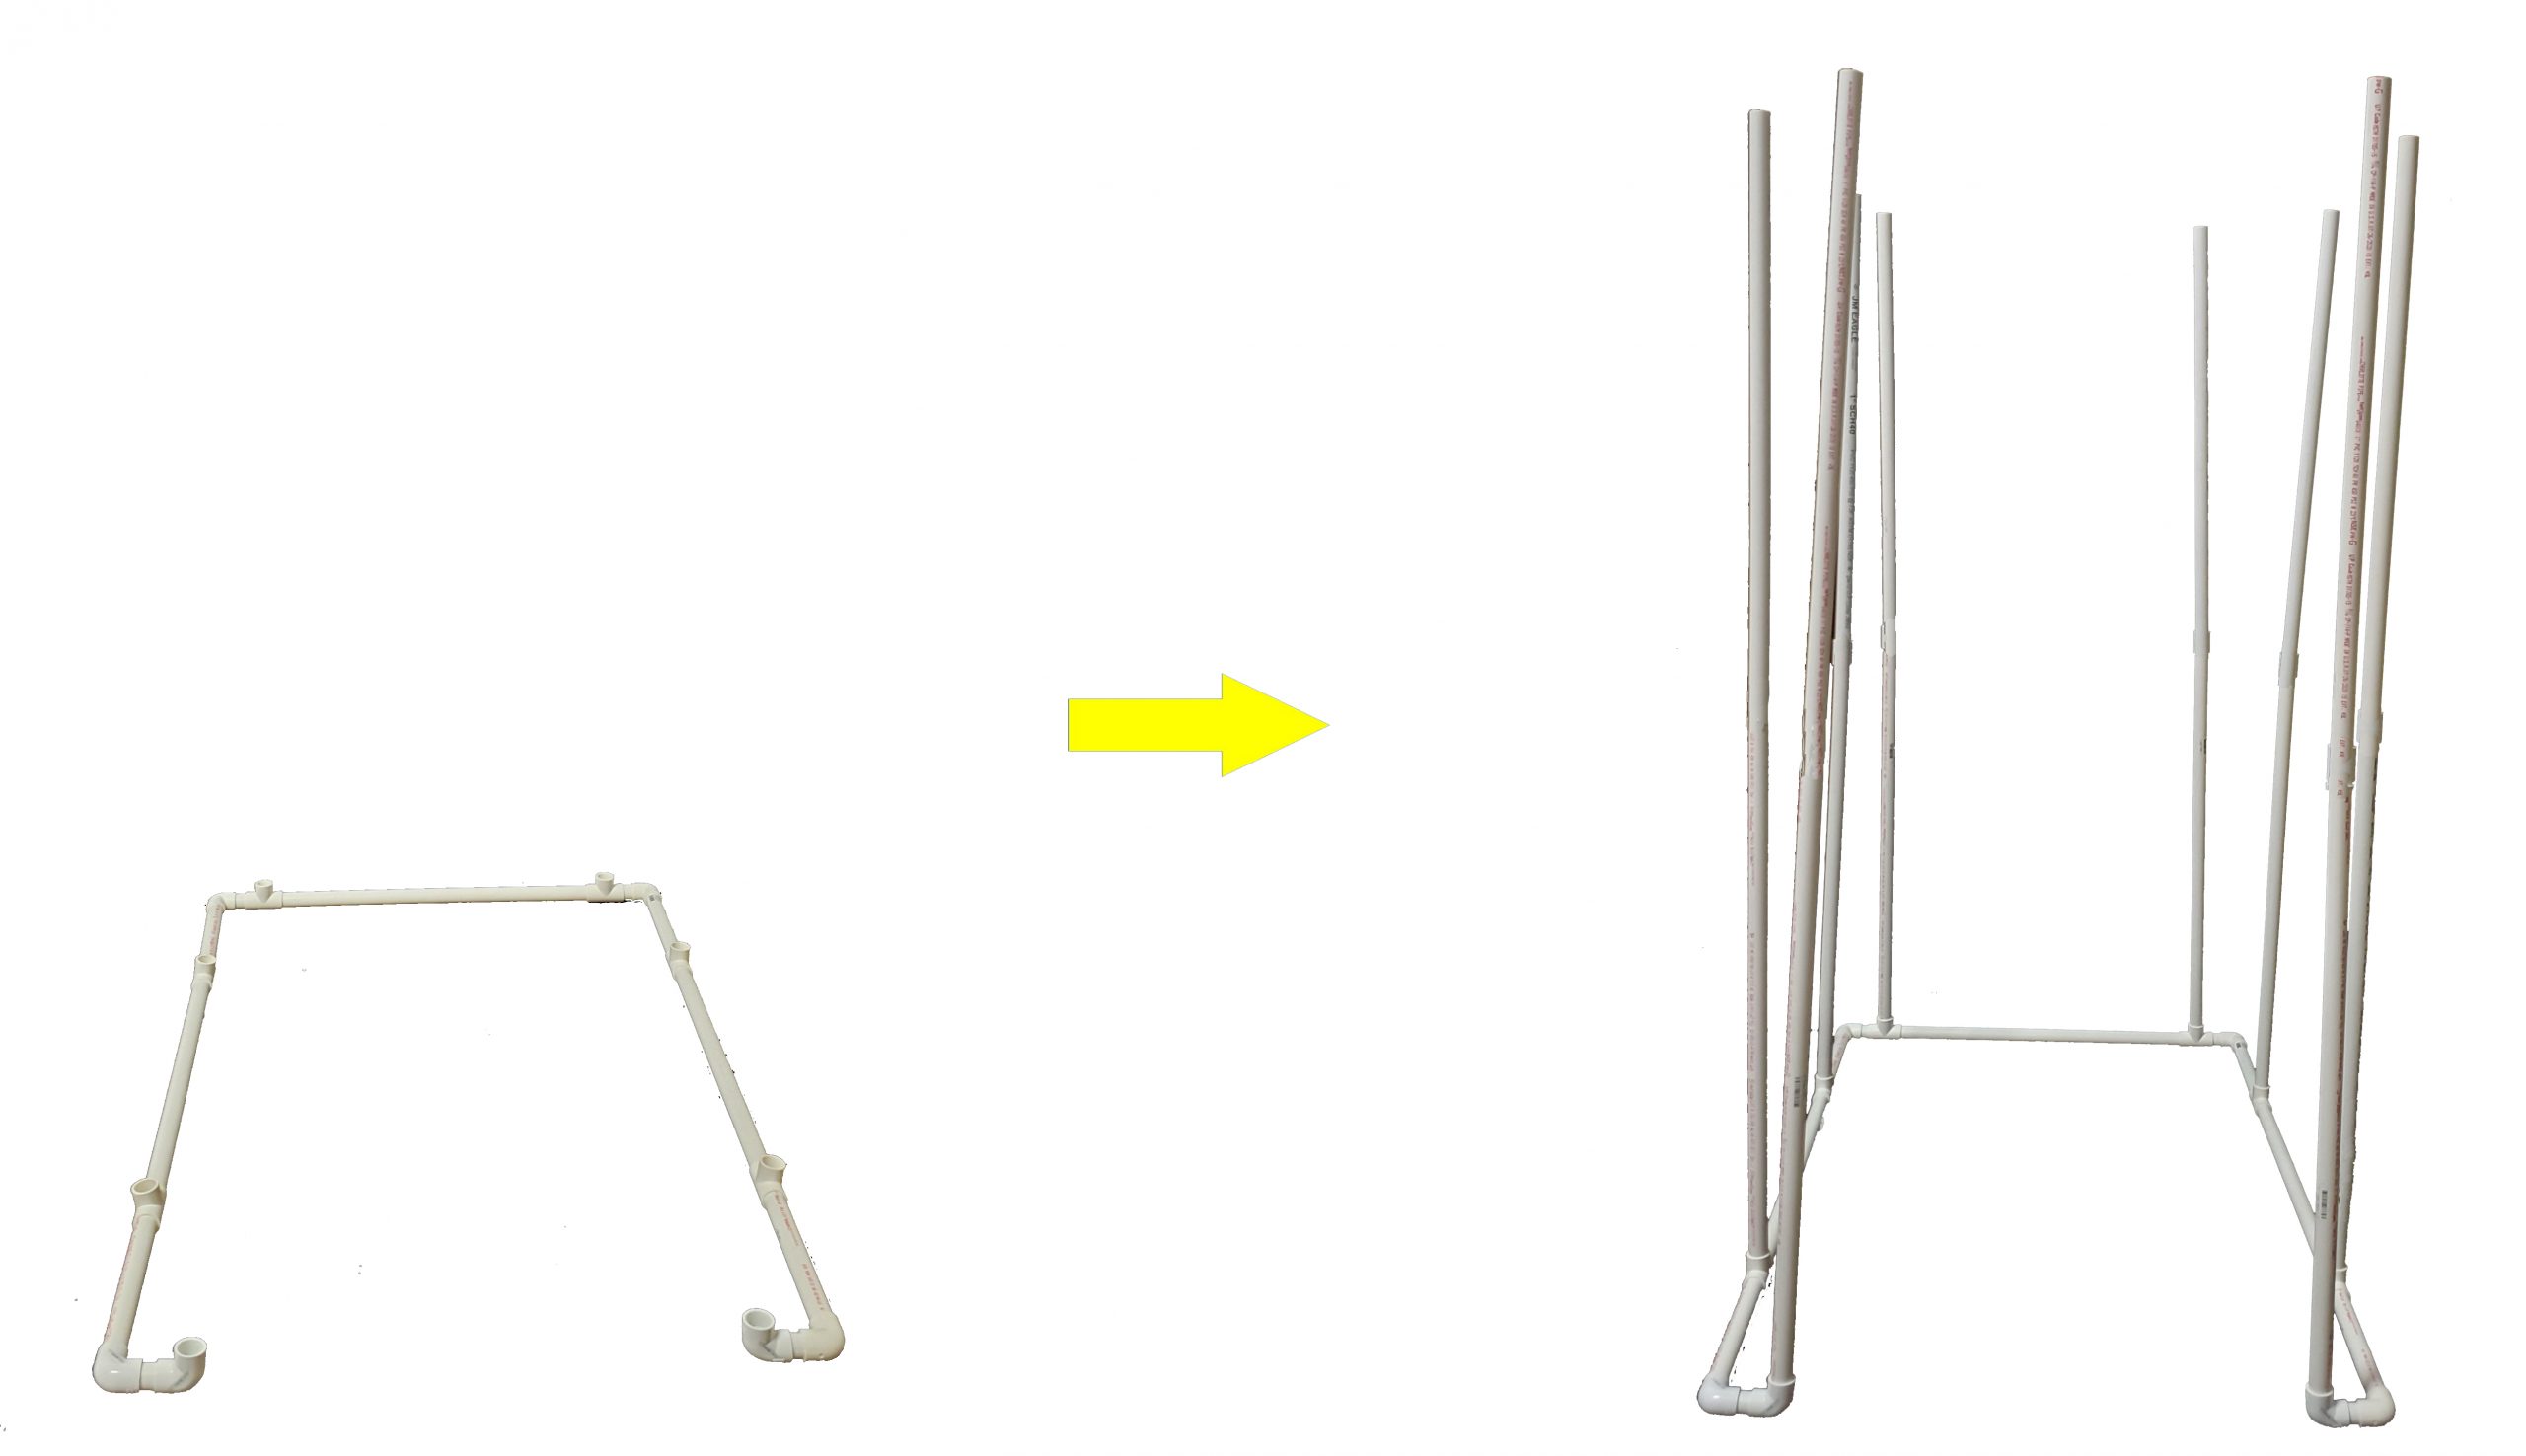
c) Insert the vertical poles into the base frame part
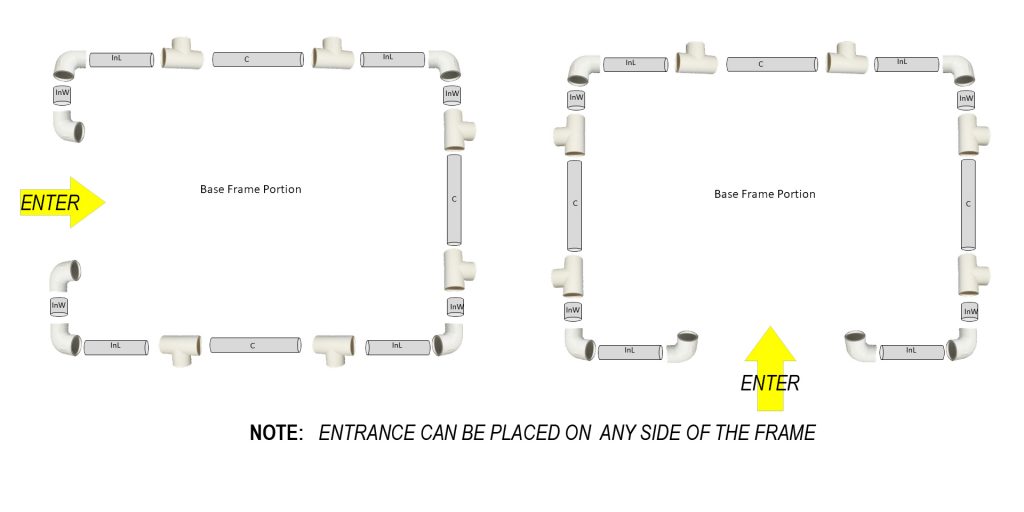
Note: If you have a frame that is not square you may want to reposition the entrance on the base frame portion to any side that suits you best:
This Completes the PVC frame assembly.
But WAIT!
You need quality sound absorption covers to turn a bunch of plumbing supplies into a practical and efficient Vocal Booth to do your recording.
To turn the assembled PVC frame into an actual working Vocal Booth – Cover the frame with acoustic blankets Producer’s Choice.
For this Frame Size you could use SB-VG blankets for the walls and blankets for the roof.
Hang the blankets on the frame:
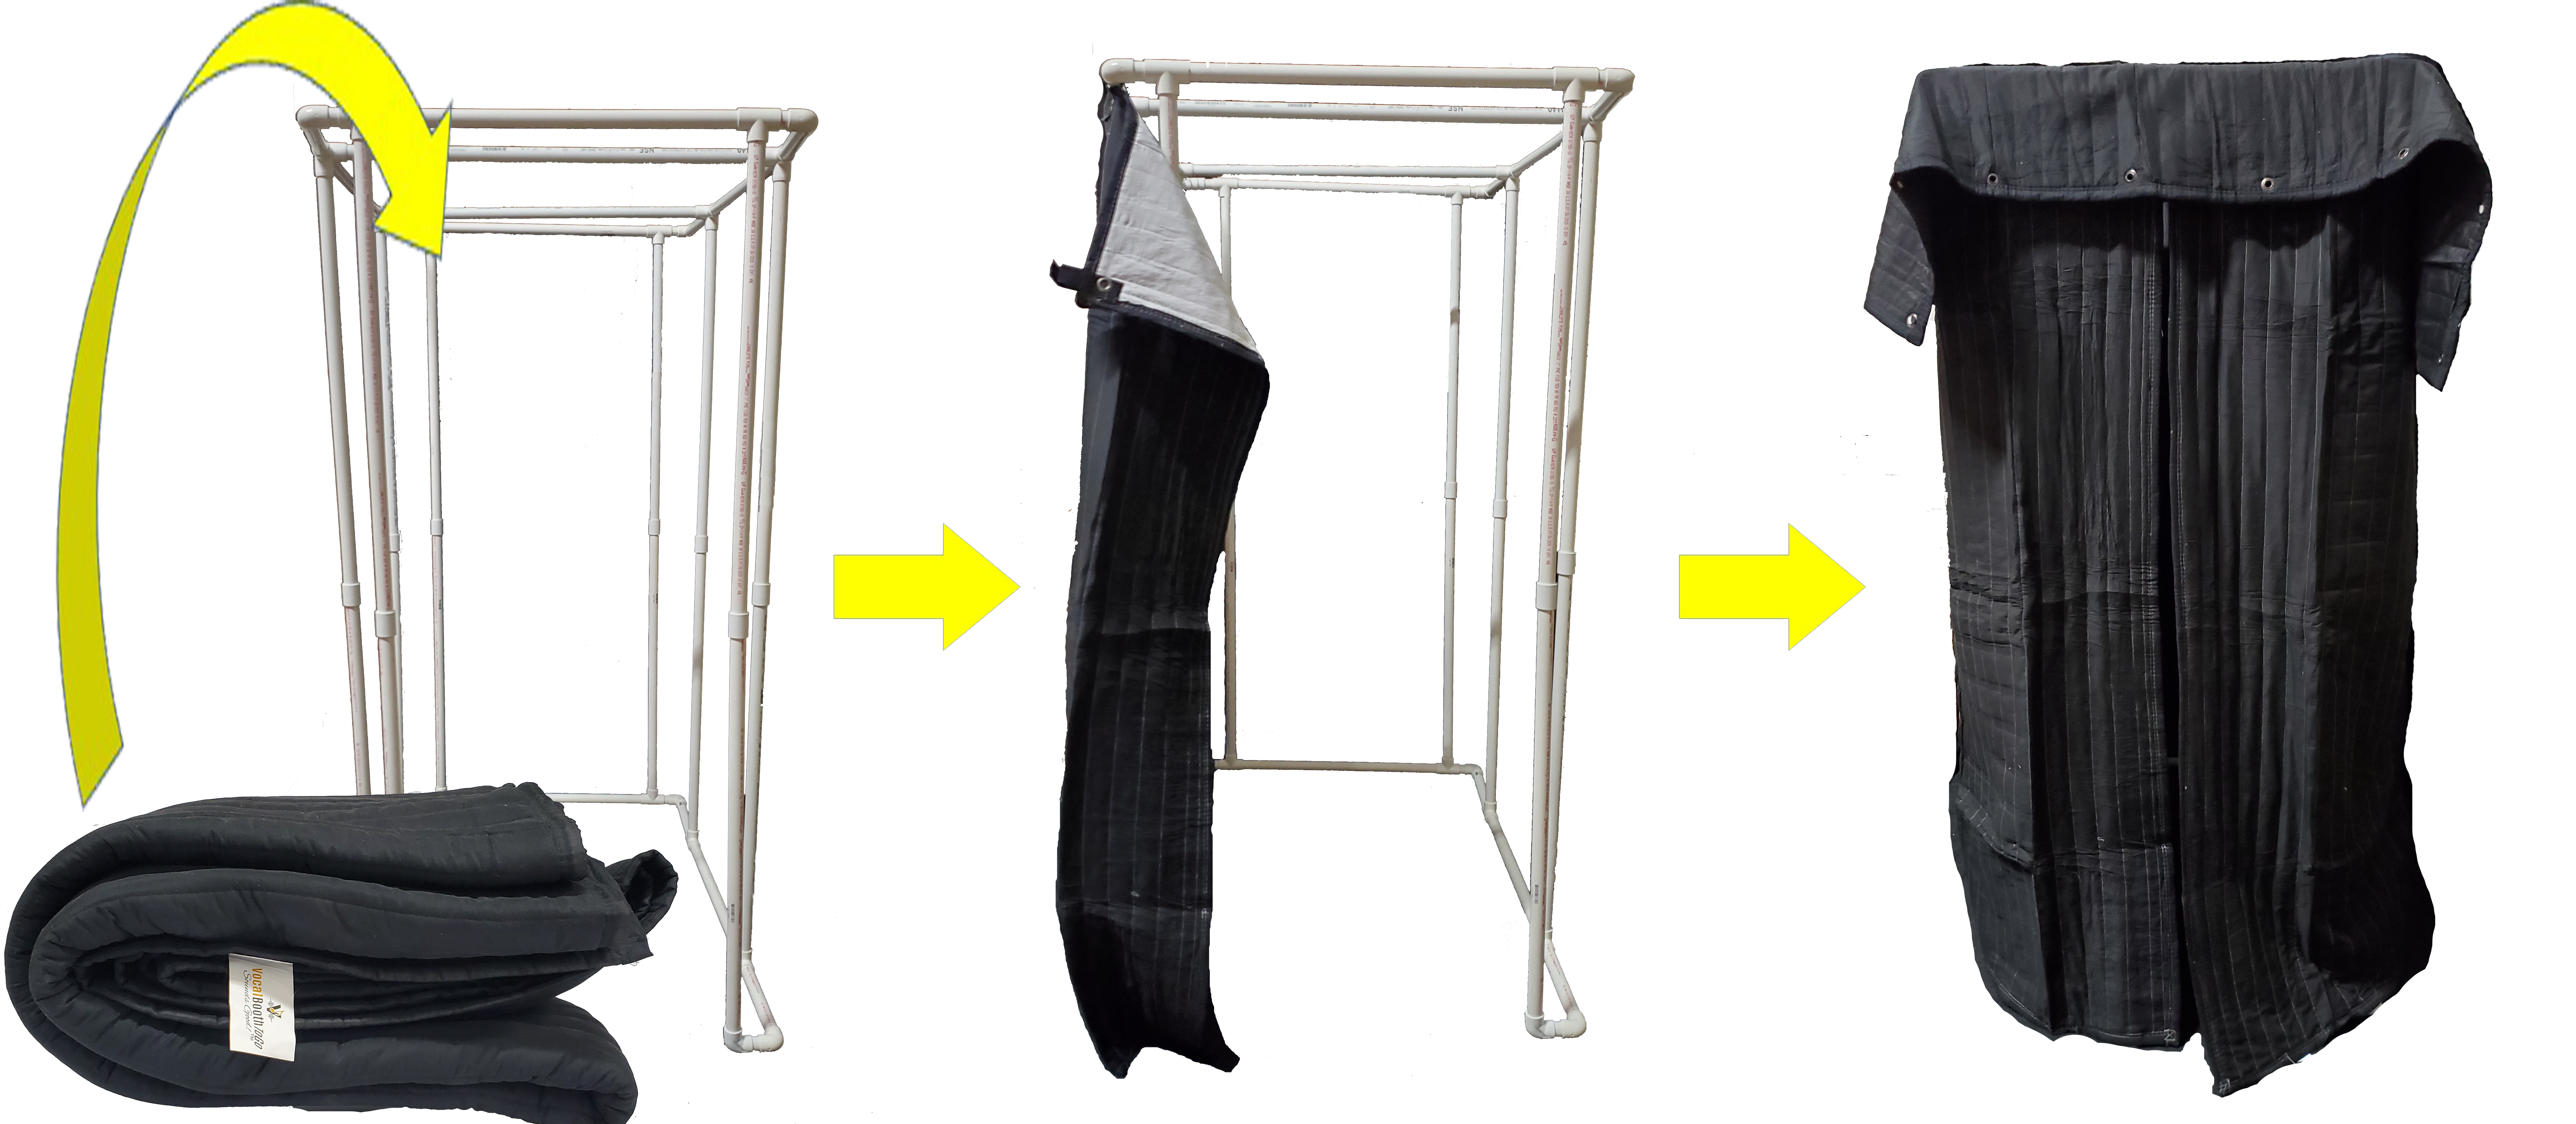
PVC-frame-CoverWith-Blankets
Tip: To make the roof look tight and pretty connect the corners together by zip ties.
If you had ordered the SB-VG, then simply wrap the Velcro tie ups around the top of the frame.
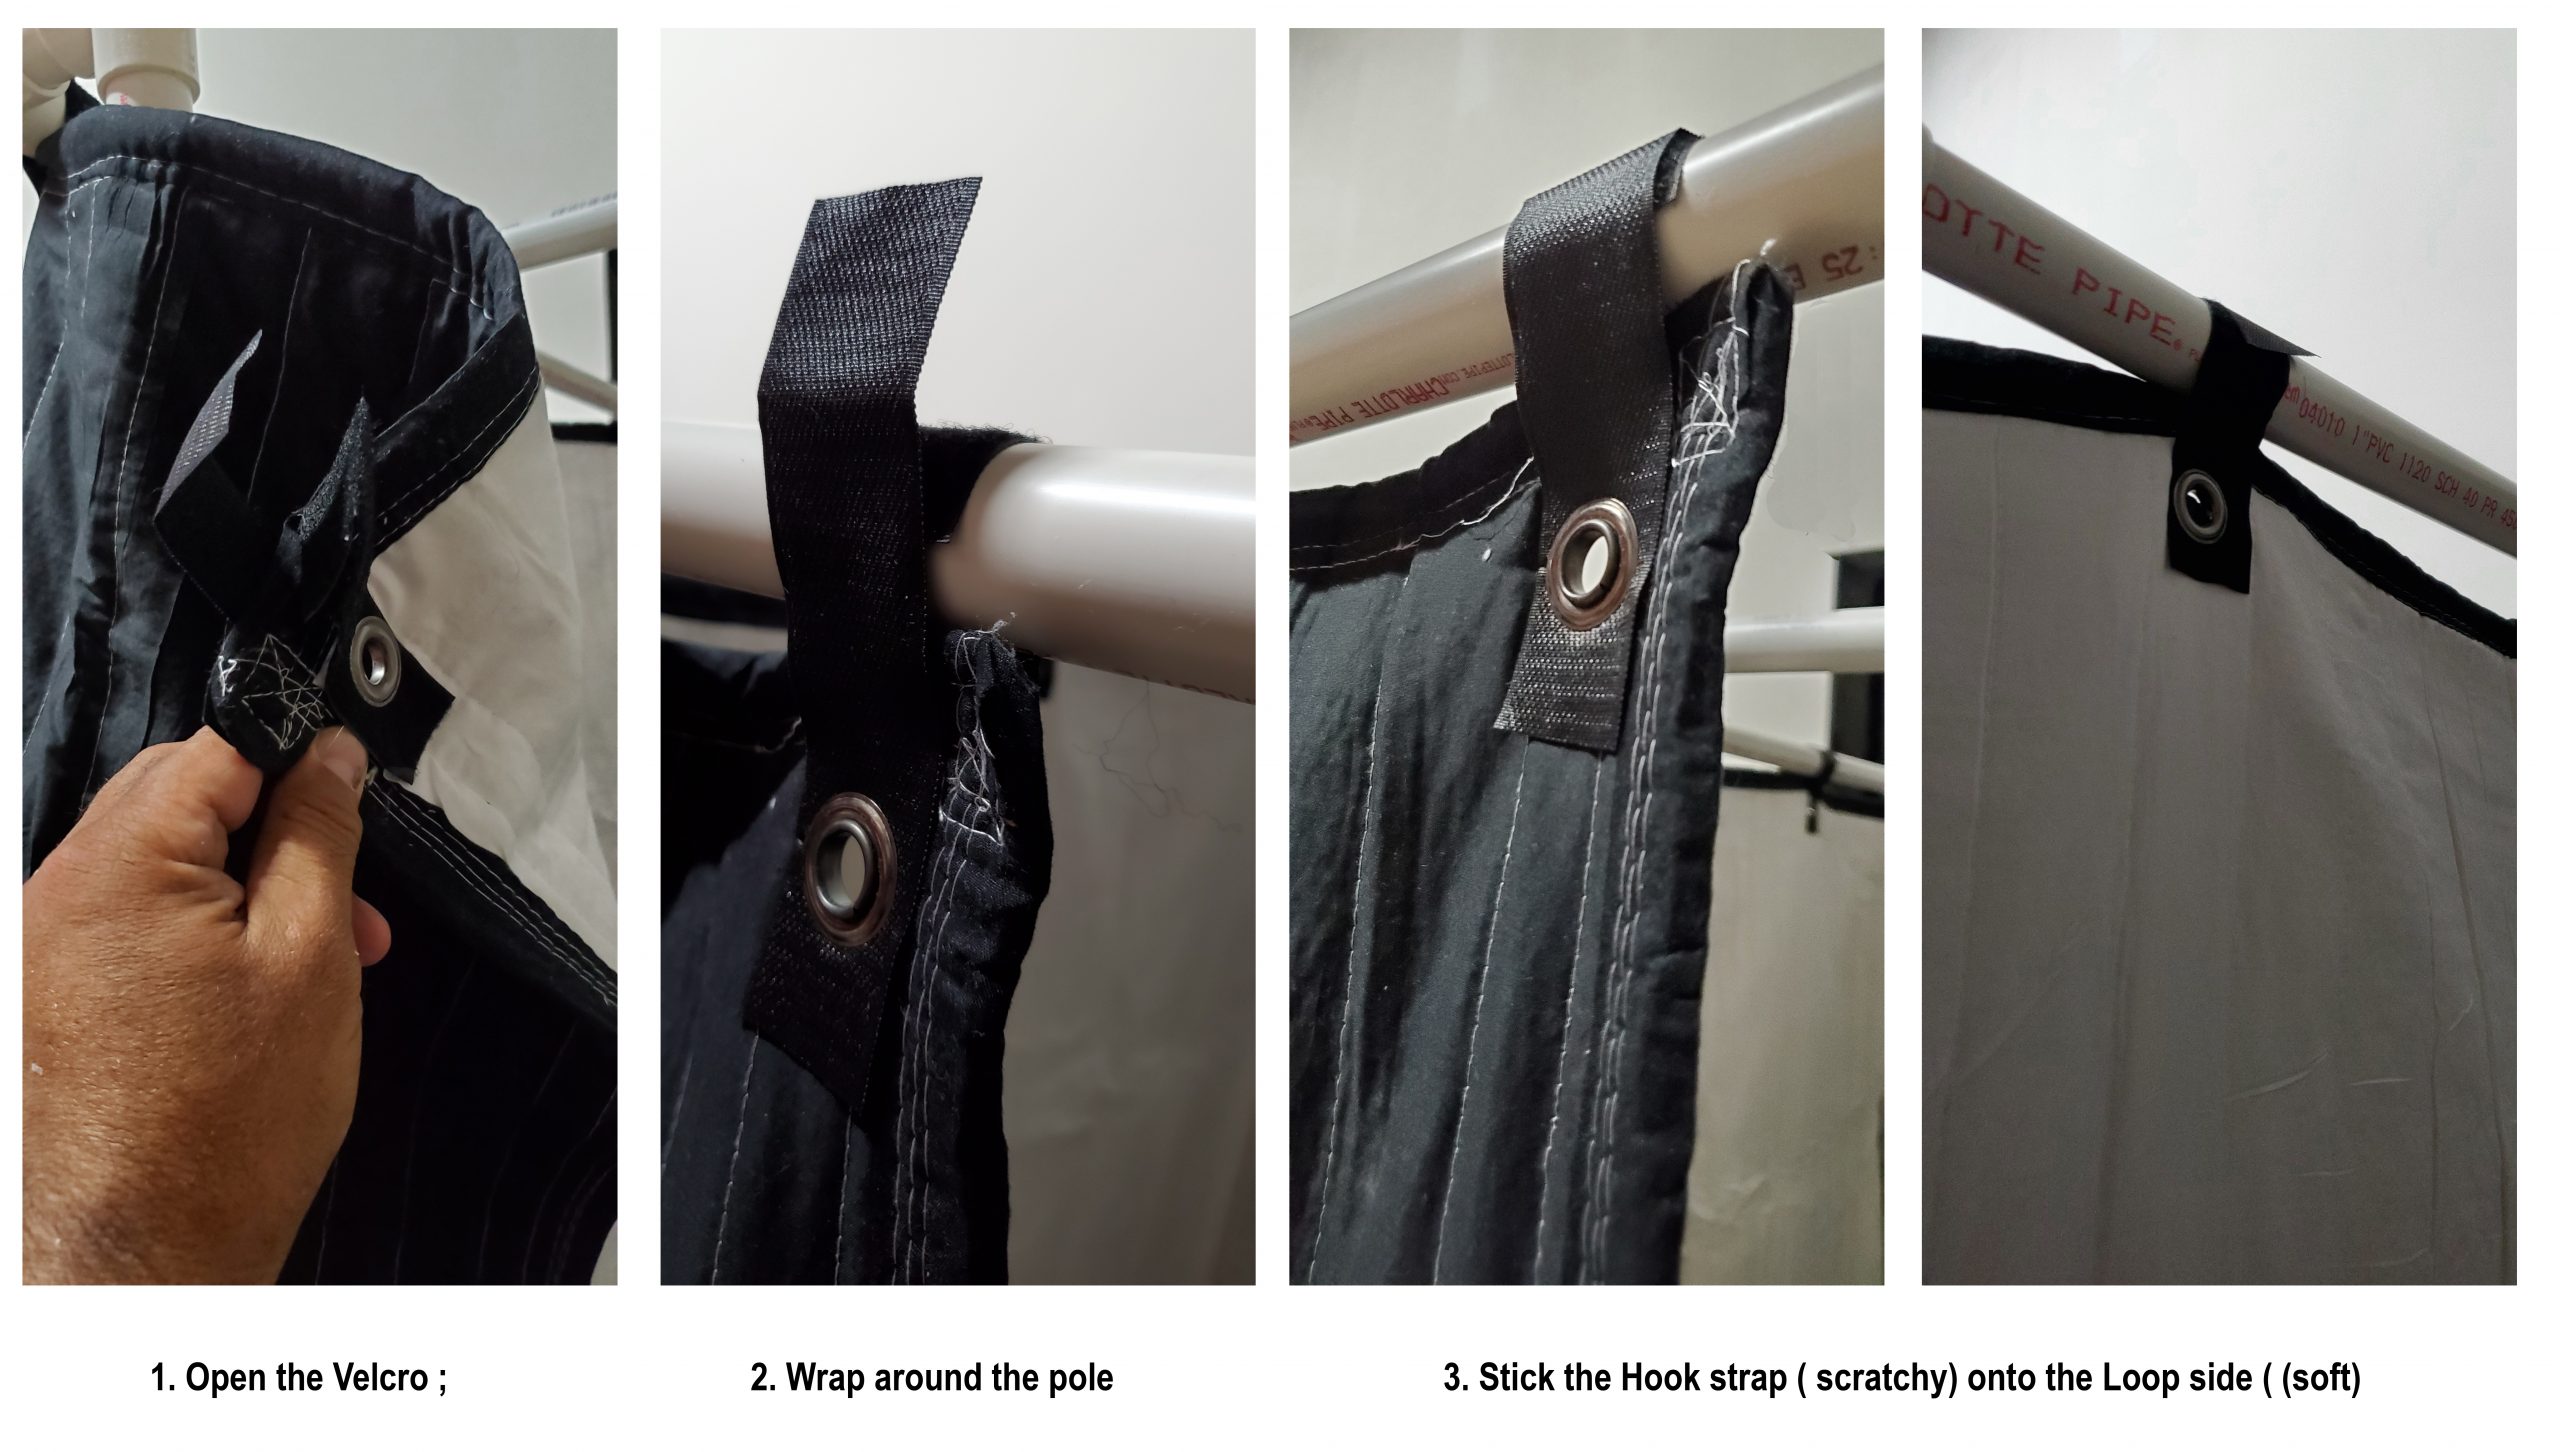
NOTE: In these instructions we show how to hang the SB-VG blankets. (Acoustic Blankets with Velcro and Grommets, specially designed for use in DIY Vocal Booths). If you use a different type of blanket, you can use zip ties or any other attachment method.
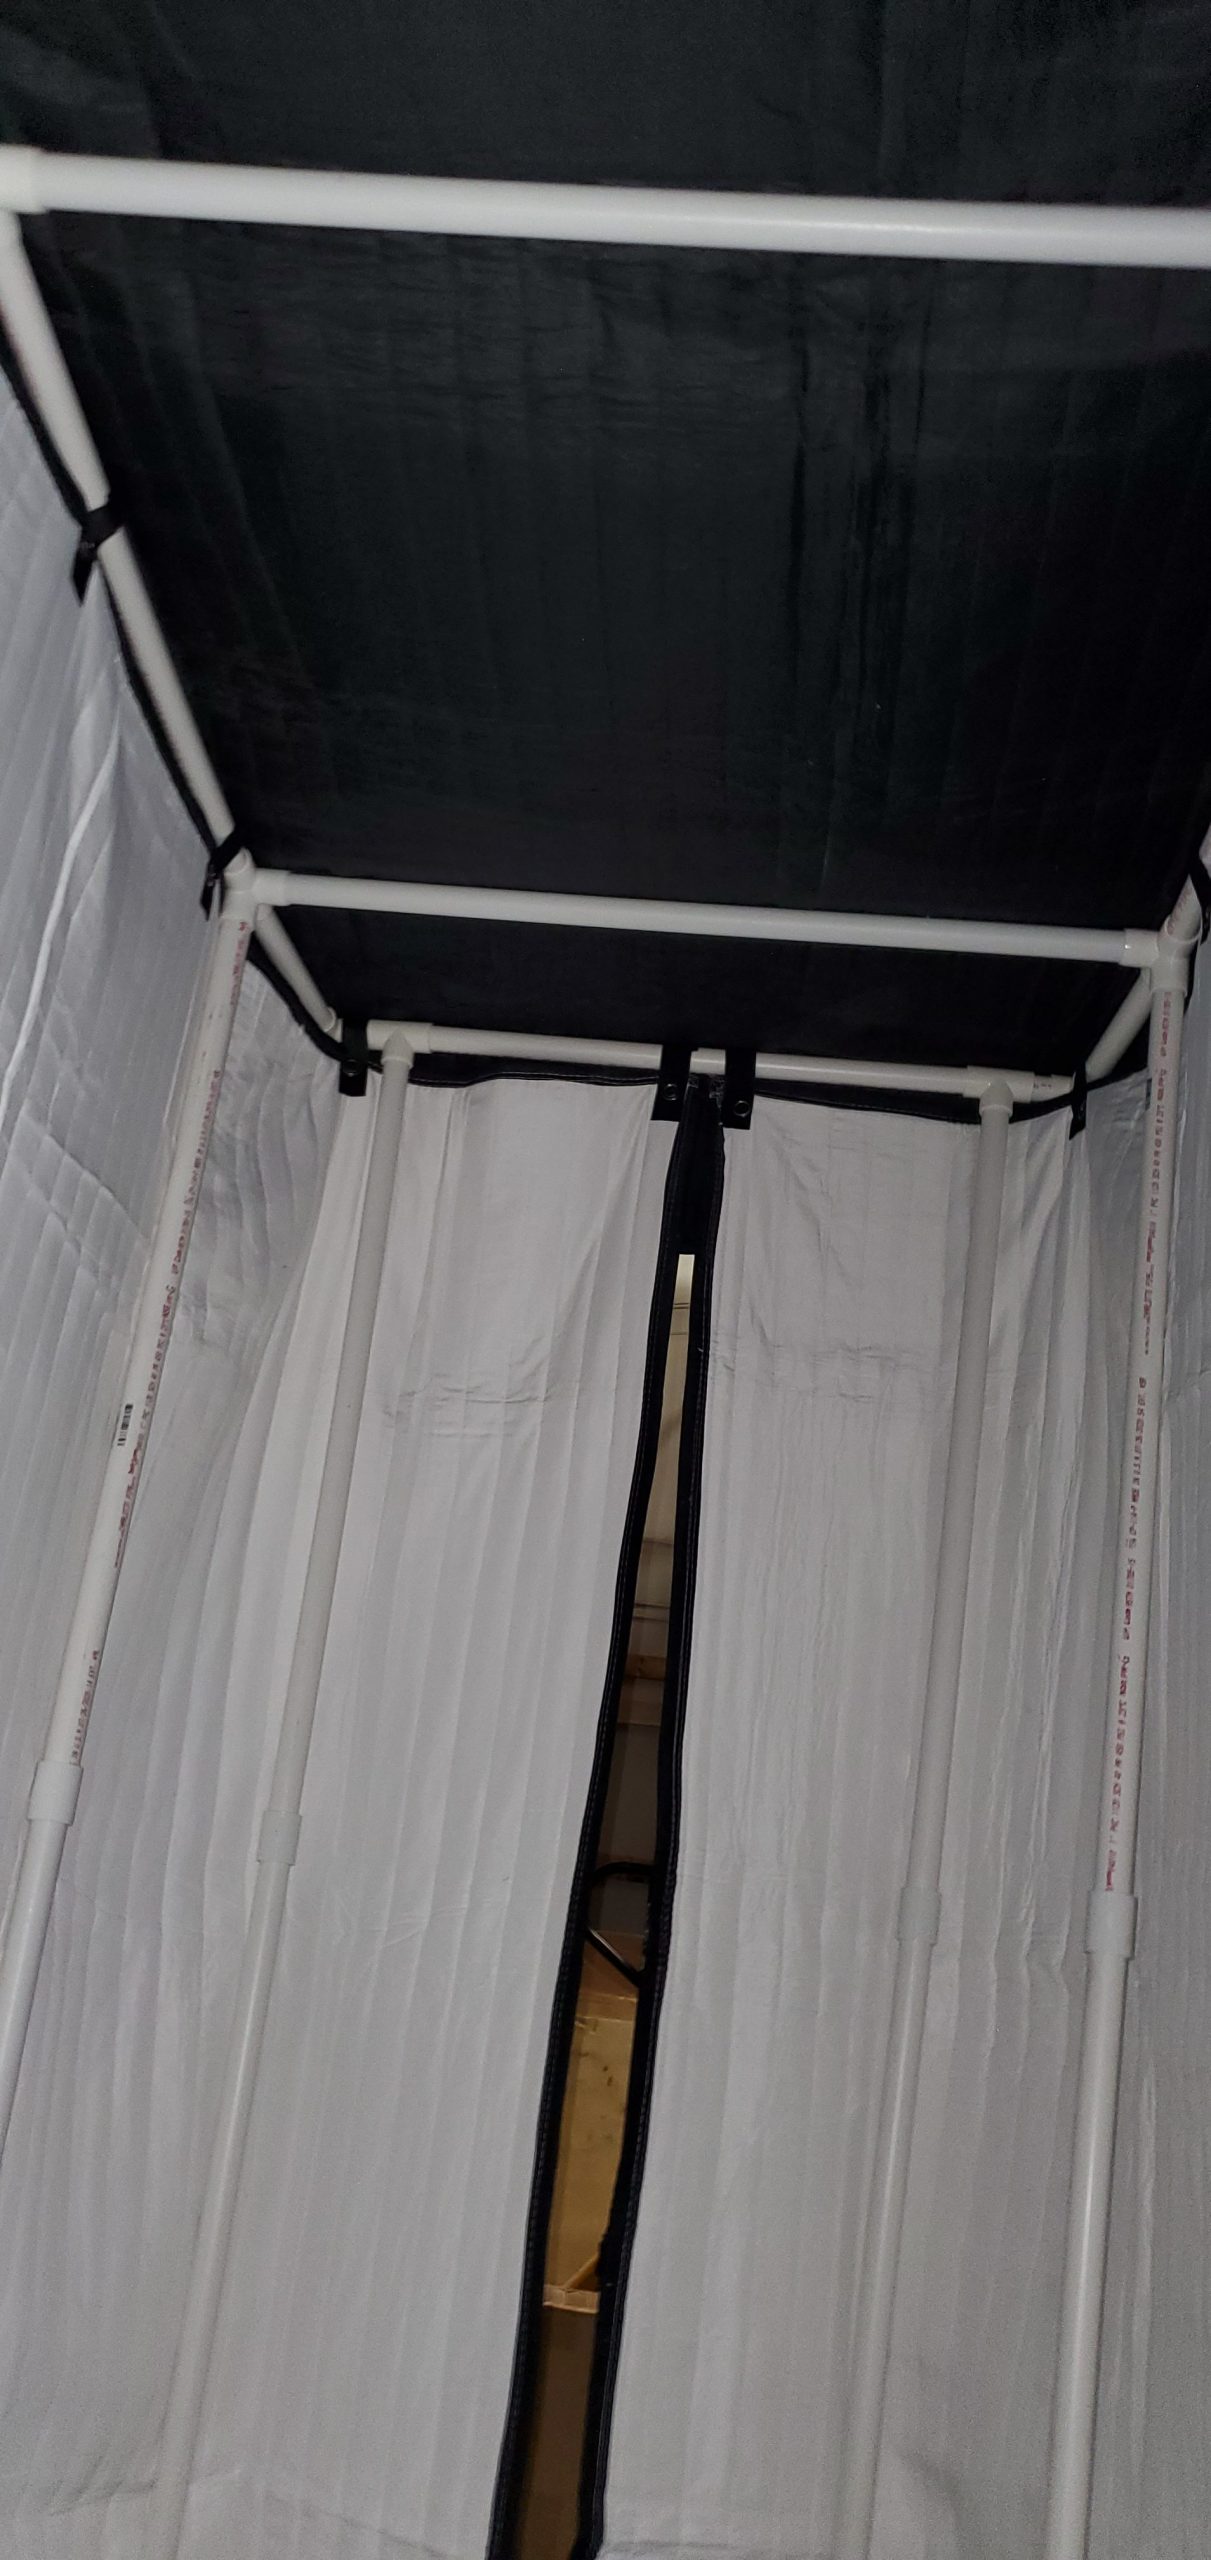
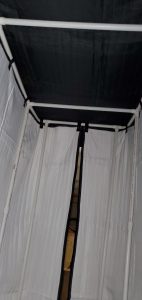
If you added cross bars to your PVC frame, this is what the assembled booth would look like from the inside:
What acoustic blanket to choose?
We suggest SB-VG or any other Producer’s choice blanket of your choice. Producer’s choice blankets are the true acoustic product, they have been tested at independent acoustic lab. NRC 0.8. (80% noise reduction). Or if you overlap them or hang them loose the sound absorption efficiency goes up to about 95% sound absorption.
This finishes the Complete Booth assembly.
Now set up your gear and enjoy your new booth!

CUSTOM DIY PVC Vocal Booth Frame. Make and Assembly Instructions
 Complete vocal booth made with PVC has two major components:
a – sound absorption covers and
b – a frame to support it.
This is what the end result would look like : ===>
PVC pipes and connectors are inexpensive, readily available and easy to work with, this is why the PVC booths are such a popular DIY solution. (If you cannot find the right connectors in your local store – try internet.) Disadvantage, of course, is that they are “assembly required” so it could be a little time consuming and messy. And with all the appeal it might be a nuisance if you have to record on location often. PVC Glue. We strongly recommend to glue the pieces together. (You can try using it without gluing it, of course, but the chance of the frame collapsing on your head is medium to high.) NOTE: – This calculator works best for frame size between 37 to 78 inches Width and/or Length. If you want the frame size larger that 78W x 78L we strongly recommend to make additional vertical supports. Simply add another set of Vertica pole every 26 inches. Tools: to cut the pipes you can use a PVC pipe cutter, but it leaves a burr at the cut edges, which makes it very difficult or nearly impossible to fit into the connectors.
So we suggest just a regular hack saw.
(Or wood hand saw with many many small teeth. Hack saw is better. Use hack saw. It will give you a much cleaner cut.)
NOTE: * – To cover the frame we recommend Acoustic Sound Blankets Producer’s Choice. We included suggestions on how to attach the blankets to the frame.
CUT THE PIPES AS FOLLOWS:
To create PVC frame: ” Wide, ” Long and ” Tall
You will need to buy 10′ long PVC pipes, so you have enough material to cut inches total length of all the pipes.
PVC frame pipe cut sizes: |
|||
| PVC pipes description | SKU | Quantity | Size (Inches) |
| Insertion – L (for Length) | In-L | 8 | |
| Insertion – W ( for Width) | In-W | 8 | |
| Center Piece | C-P | 7 | 28 |
| Vertical pole | V1 | 8 | |
| Cross Bar ** | X-B | 2 | |
| NOTE: ** – We recommend to add cross bars to frames larger than 40 x 40 inches. for smaller frames the cross bars are optional. | |||
Connectors: The following connectors are included:
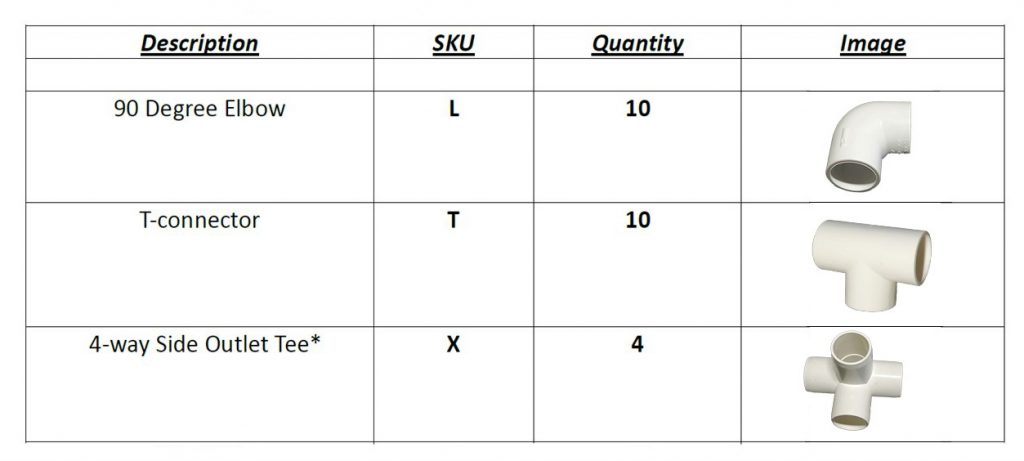 NOTE:
* If you are building a frame that is smaller than 40 x 40 inches, you can replace the 4-way connectors with the T- connectors.
** For smaller frames, like 40 x 40 the top cross bars are not necessary. Cross bars add stability and is a good way to support the roof blanket. (We recommend to use the Cross bars for larger frame size.)
PVC FRAME ASSEMBLY INSTRUCTIONS
a) Assemble the base frame portion: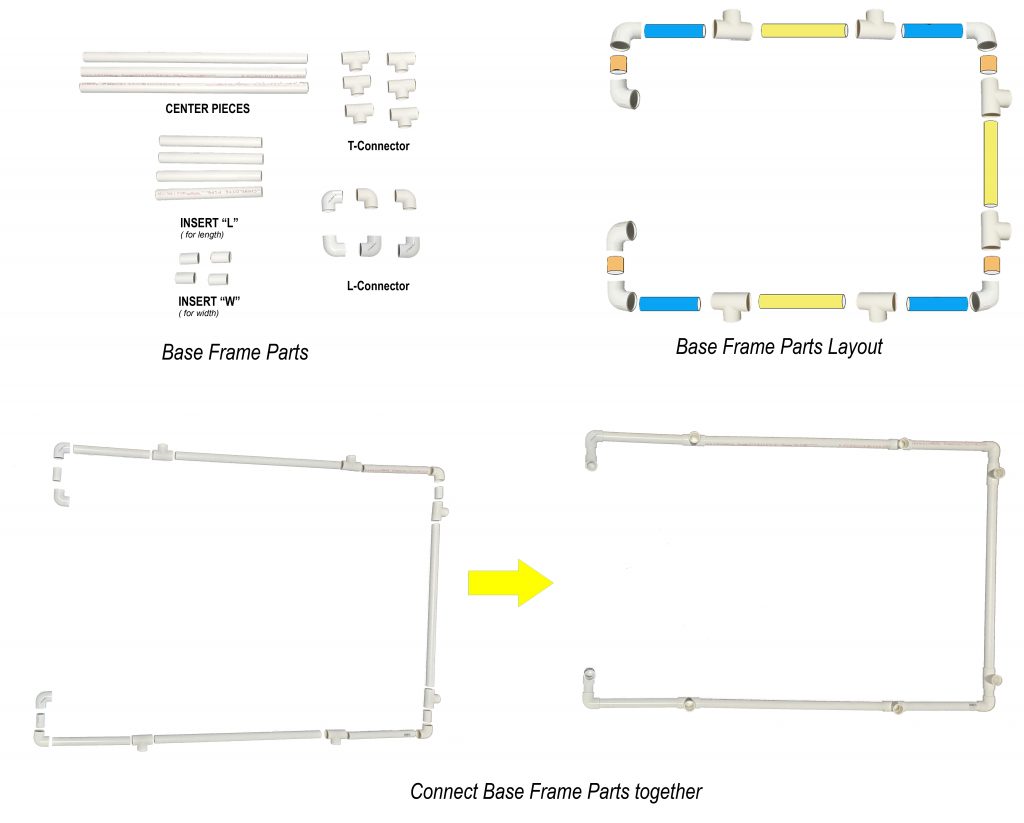 b) Assemble Top frame parts:
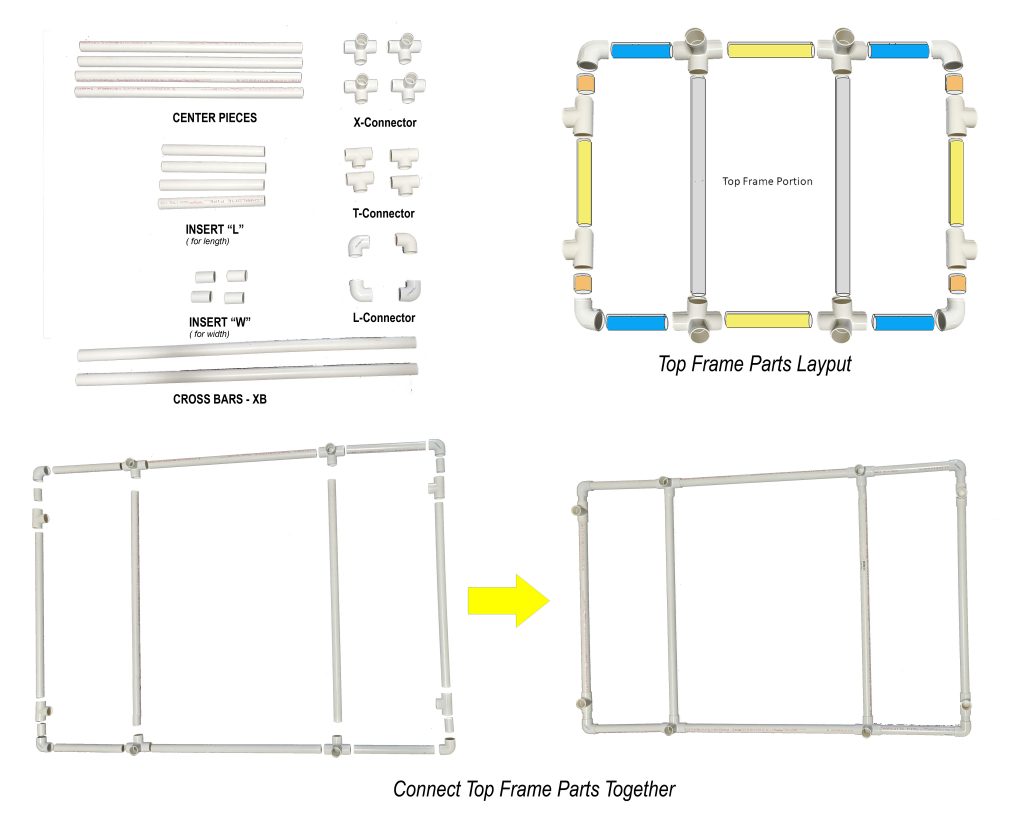 c) Insert the vertical poles into the base frame part
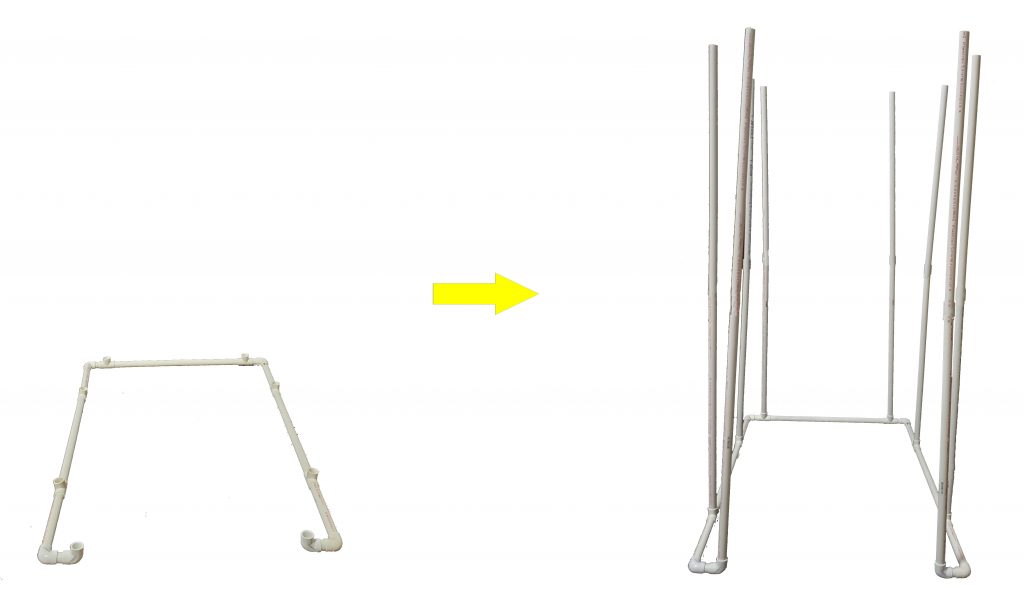 Note: If you have a frame that is not square you may want to reposition the entrance on the base frame portion to any side that suits you best:

This Completes the PVC frame assembly.
But WAIT!
You need quality sound absorption covers to turn a bunch of plumbing supplies into a practical and efficient Vocal Booth to do your recording.
🙂
To turn the assembled PVC frame into an actual working Vocal Booth – Cover the frame with acoustic blankets Producer’s Choice. For this Frame Size you could use SB-VG blankets for the walls and blankets for the roof. Hang the blankets on the frame: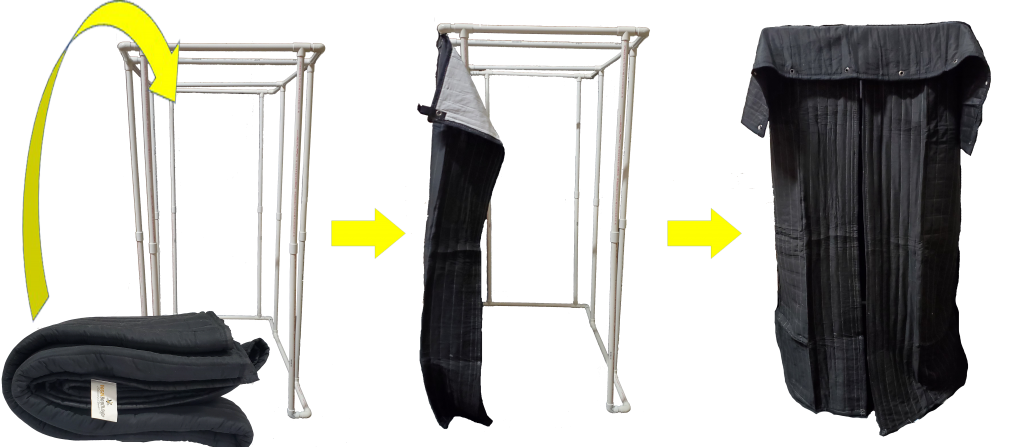
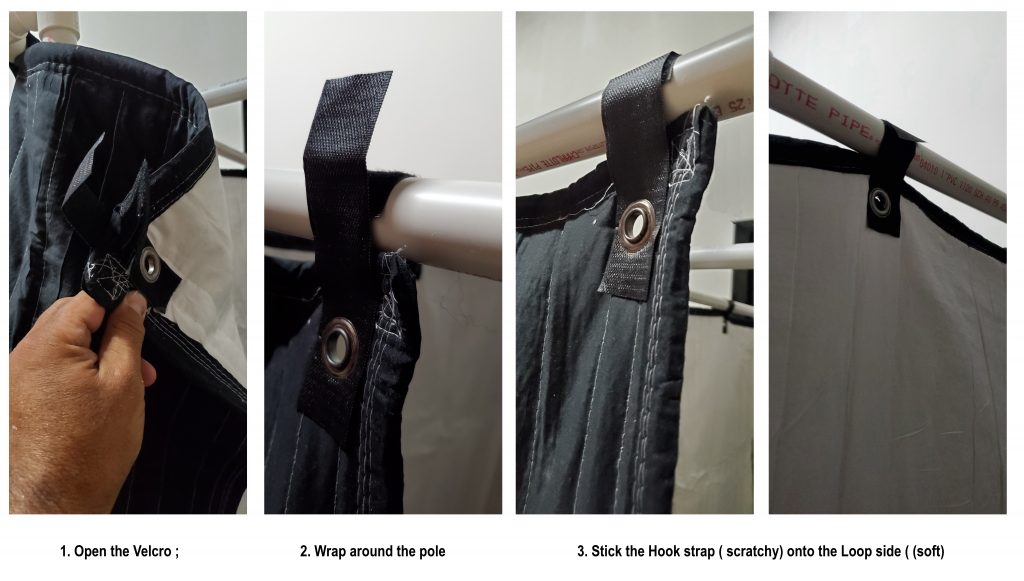 NOTE: In these instructions we show how to hang the SB-VG blankets. (Acoustic Blankets with Velcro and Grom
 mets, specially designed for use in DIY Vocal Booths). If you use a different type of blanket, you can use zip ties or any other attachment method.
If you added cross bars to your PVC frame, this is what the assembled booth would look like from the inside:
What acoustic blanket to choose?
We suggest SB-VG or any other Producer’s choice blanket of your choice. Producer’s choice blankets are the true acoustic product, they have been tested at independent acoustic lab. NRC 0.8. (80% noise reduction). Or if you overlap them or hang them loose the sound absorption efficiency goes up to about 95% sound absorption.
This finishes the Complete Booth assembly.
Now set up your gear and enjoy your new booth!
