With access to professional audio recording studios being limited, building a home recording studio that can deliver professional quality audio recording is a must. Microphones and other audio recording equipment can be purchased online easily, but acoustics….. acoustics has to be dealt with individually, on a case-by-case basis.
Yet there are acoustic products and solutions that, like a good recipe, work for everyone. Of course, you need to taste your cooking or, in this case, test your room sound.
Here we want to offer some solutions that work.
If you already have space, a room, an office, or even a closet that you would like to use as your Home Recording Studio or Voice Over room, and want to improve how it sounds, or need to reduce traffic noise coming through windows, eliminate echo and reverberations and record a professional quality sound then read on.
Before you start building your recording studio some decisions must be made. The decisions are:
- Where?
- How big?
- and How?
WHERE? Location of your new recording space is very important.
Because of:
Noise. The best way to get rid of the noise is to find a place where there is no noise. Oftentimes this approach is simply overlooked. I suppose this is a matter of priorities: should the vocal booth be positioned near a window, and then try solving a problem of traffic noise, or is it better to put it away from the window somewhere where the traffic noise is not so loud already?
Room acoustics. Room acoustics usually means how reflected sound will affect your recording. This is a whole science, so we will try to summarize it as: It’s tricky! The idea is that you want to record direct sound. Sound reflections from walls, floor, ceiling, and other reflective surfaces get recorded with a small delay and make the recording muddy. So if you place your recording space in a room with lots of hard bare walls, it could be a problem.
HOW BIG? The size of the studio also matters from the acoustics point of view.
But for a home recording studio, it matters more how you are going to use the space: is it just for you to work alone? Are you going to record dialogs and need to be able to fit more people? The size of the apartment or house is also a constraint. You have to work with what you got.
HOW? Well, this question depends mostly on the budget and if you are a landlord or a renter. If you own your house you can do what you want, but if you are renting an apartment, chances are you are not allowed to screw it. I mean you cannot drill holes or rearrange walls, this could cost you your deposit. Or repair bills when you are ready to move up.
As you can see all these decisions are individual and every individual must make them individually.
But we can suggest something.
WHERE? Away from windows and away from interior walls with neighbors. If you are making your money in your home recording studio and in your vocal booth, not in bed, then maybe it makes sense to move the bed to the window and clear the quiet space to construct the vocal booth.
Often, we hear that people try to convert a closet under stairs into a vocal booth, but now they have to be fighting with the noise coming through the stairwell. It is important to realize that stairs are a traffic pathway, and also it is a hollow tube that is a conduit for noise. Noise that is happening upstairs is going to travel downstairs through the stairwell because this is the path of the least resistance. If you do not live alone, fitting a closet under the stairs into a vocal booth may be a challenge.
Ideal location for a recording space is a room without windows, away from the neighbors, street traffic, and away from the stairwell. (also, away from HVAC, Refrigerators, children, and other sources of noise)
HOW BIG? Well just make sure you can fit yourself and the equipment comfortably. But if you have to stick the booth between the bed and the wall, or you are limited by the closet space, we totally understand.
HOW? And this is what this article is about!
The goal of building a home recording studio is to get a good quality sound. This is it. There is no other reason to build a recording studio at home. Unless, of course, you want to sound cool telling other people how much money you spent on building a “room – within-the-room” recording studio.
If you are a voice actor your task is somewhat easy: you need to make the room as dead as possible.
Kill it! Kill the room!
It sounds very violent, but in fact, it is the opposite. What you need to do is to absorb reflections. So, you surround yourself with cozy soft plush materials that will absorb the sound. Fluffy pillows or cute stuffed bunnies will work. But there is a better way!
Much better than any other product in terms of efficiency, convenience, durability, and cost, or return on investment, is the Producer’s choice sound blanket. It has an impressive NRC of 0.8 ( 80 % sound absorption), which makes it a truly acoustic product. You might have heard about moving blankets used for covering the walls, but that is NOT an acoustic product and yes, it will absorb some sound reflections, just like a stuffed bunny ( probably less, though, because the stuffed bunny is thick), but it is not worth the money.
Warning: Do not be fooled, because some websites market cheap $5-$10 moving blankets as “sound blankets” simply by pricing them high.
Acoustic Sound Blankets Producer’s choice on the other hand has been tested in an acoustic lab (more than once) and proved to be a reliable solution for your acoustic room treatment.
To treat the room acoustically hang the sound blankets along the walls, allowing about 3 inches of space between the wall and the blanket. For even better performance try using them in pleated fashion, kind of like a semi drawn curtain. This increases the efficacy of the blankets up to 95%. What to completely kill the room? Double them up and it will give you 100% sound absorption. as one of our customers said: “It sucks the sound right out of the room!”
HOW MANY BLANKETS DO YOU NEED TO TREAT A ROOM?
To figure that out, you need to measure your room. How high is your ceiling? What are the Length and Width of the walls?
Are you planning to cover the whole wall or just some of it?
If you want to cover the whole wall you can estimate the number of sound blankets you need by using this Acoustic Room Treatment Calculator.
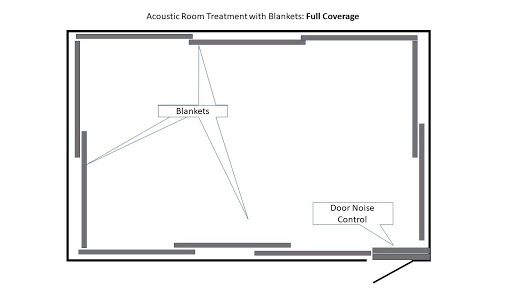
Treating the whole room:
If you are a musician or a drummer or you want to record a band, you would probably want to treat the whole room.
For best results completely cover all the walls and place the Door Noise Control blanket over the door:
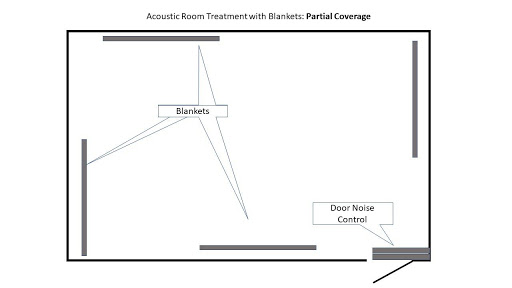
If you do not want to cover the whole room it is recommended that at least 30 % of the room is covered by sound absorbing materials. And the Producer’s Choice blankets should be placed in an intermittent fashion to prevent direct reflections from wall to wall.
The diagram below shows how the intermittent placement of blankets affects reflected sound.
(Note: this is just a demonstration of how intermittent placement of blankets works. For actual blanket placement please consider covering the first reflection points first, location and pick-up pattern of microphone, etc.)
It is better, of course, that the blankets cover the whole wall from floor to ceiling and we offer a variety of sizes to fit the most common options:
Our Producers Choice Sound blankets are all 80 inches wide and are offered in three stock heights:
and 120” (10ft) high.
We also can make them longer as a special order. To make it easier to hang they come with 8 Grommets preinstalled on the top 80” side.
Sound blankets come in two color options: all black and black/white. All black has a black thread and was designed for movie producers, so they do not show up on the movie set. The Black and White blankest have white stitching, this way there is no black thread visible on the white side. The white side is beneficial for photographers because it reflects the light. The white color also makes a room look larger and brighter. Both blankets perform the same acoustically.
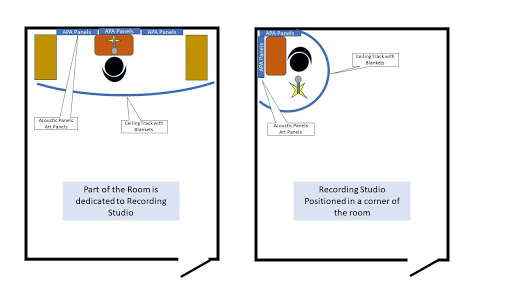
Treating only part of the room.
SOLUTION: Vocal Booth on Tracks
Although acoustically treating the whole room and turning it into a home recording studio is great, it is not always feasible or possible. An extra room to be dedicated to being a recording studio simply may not be available.
So what if you want to have only part of the room as your home recording studio and the other part to live in?
There are a couple of options for that as well.
One of the most convenient and flexible options is using the Flexible Ceiling tracks. These are plastic tracks with steel cores. The tracks can be attached to the ceiling (ceiling tracks) or a wall (wall mount tracks). You can bend them in any shape and outline a portion of the room that you want to dedicate to your home recording studio. The advantage of it is that you do not claim any floor space or have to build a permanent structure. When not in use you can simply spread the acoustic blankets open like stage curtains and have the use of the whole room. And when you are ready to work – close the sound curtains and now you are in your own acoustically treated recording space!
Tracks can be ordered of any length. To estimate how much track you need, – set up your gear, table chairs, etc., and lay a cord or a rope around it, where you want the blankets to be. Then measure the length of that piece of cord. – this will be the length of the ceiling track kit your need to order.
To make it easier for you to order we grouped all hardware that is needed to suspend one blanket into a Track kit 7 ft long, which includes 7 ft of flexible track, 8 ceiling brackets (or wall brackets), 20 Screws and anchors, 10 rollers and 10 S-hooks and 2 end caps. If you want to order a longer track simply order several track kits and we will send it as one continuous track. For example, if you need 13 ft of a track – just order 2 7 ft tracks and we send you 14 ft of the track with all necessary hardware.
And just like that – you created a vocal booth on tracks! (we would like to call it “on Steroids”, but that would be illegal).
Setting up a vocal booth on tracks does not take much time at all. Although if you do not know how to screw things (or if you tend to screw up things all the time), it makes sense to get someone to help you.
REMEMBER: If you want the track to go in around a circle – draw the line first, then make sure that the ceiling tracks are installed perpendicular to that line.
Another reminder is that you do not want any sharp corners, because it will be difficult to make the rollers turn around a sharp corner and they can get off track!
Warning: the blankets are very heavy, even though the rollers can support the weight of the blankets and even two blankets, please be careful when sliding the blankets. Go slow.
You probably noticed that on the diagram we show the blankets on tracks and also acoustic panels covering the walls.
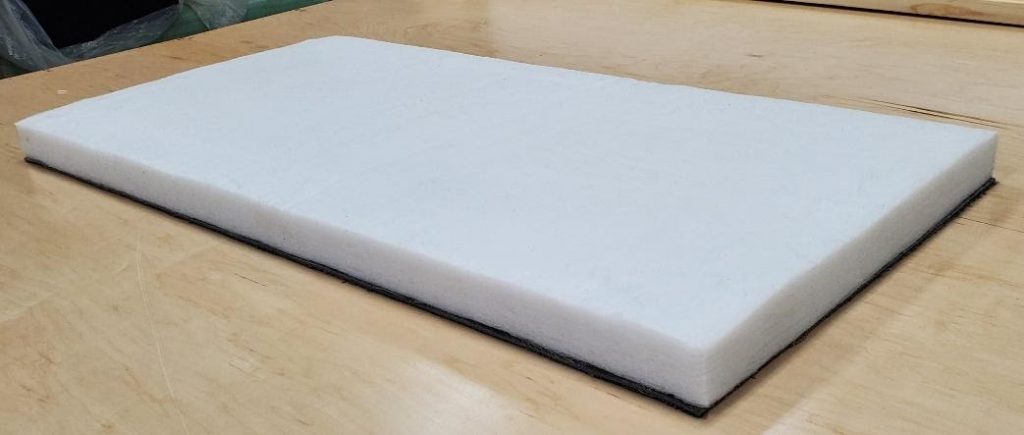
As we had mentioned above, ideally you want to cover all reflective surfaces, especially if you are doing voice over you want the room to be “dead”. So you can cover the walls with the blankets as well, but we have a different product that not only does a great job at sound absorption but also make the room interesting. Allows you to create an environment that is not of monotonous colors, but is full of life! Full of your favorite images. We have a solution for that too: Acoustic Panels Art. These are specially designed acoustic panels that have 91% sound absorption. And can be decorated with an image of your choice.
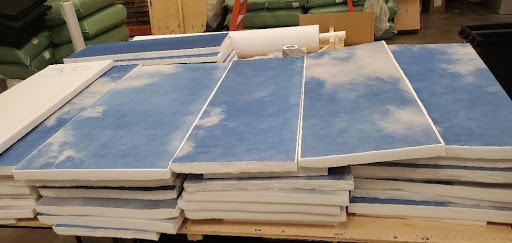
These same acoustic panels can be used as an acoustic cloud with actual clouds on them!
Well, you can say: this is all great and all, but I cannot drill anything because when I drill it in, my deposit will be screwed!
We do not want that to happen to your deposit (or to you for that matter)!
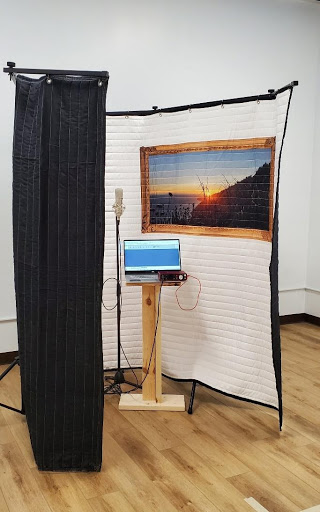
This is why we developed a special solution: FlexTee Stand:
FlexTee stand is our proprietary stand that is designed for voice over actors, singers, and musicians to be a portable sound absorption screen. This unique stand allows you to block reflections from three sides around the microphone, or backslap from behind you.
Get two stands and you can create a wraparound enclosure that does not only require any construction, damaging walls, or the ceiling you can easily move this make shift vocal booth to any location in your house or any location period.
FlexTee Stand can be used in many different ways. You don’t need to damage your walls and you can move it wherever you need it. It comes in a complete set of hooks to place on the 80” span and It can go up to 9 feet tall. You can watch this video reference here below that shows how to mount the blankets on them and a demo of a Voice artist using it in her closet.
FlexTee stand can support two blankets, but you would need to get two sets of S-hooks and position the blankets on both sides of the vertical stand for more stability.
(We also have various portable vocal booths, that are very effective, but not part of this article. Read more about Out of the box recording studio solutions (Mobile and Portable Vocal booth options) here)
TREATING REFLECTIONS FROM THE CEILING.
So far, we were talking about the walls. It is true that the walls usually the most reflective and acoustic wall treatment is critical for controlling sound in a room. But the floor and the ceiling and even the open portion of your desk are also reflective and also need to be treated.
Floor: reflections from the floor are usually easiest to treat, area rug or wall to wall carpet usually take care of that. Furniture that is sitting on the floor, sofas chairs, and even a beanie bag all either absorb or diffuse the sound waves hitting the floor. Very rarely in a home recording studio environment, the floor is a problem from a sound reflection perspective.
But the floor can carry structural noise. Structural noise is vibrations of solid structures in the building that can be picked up by your microphone even if you do not actually hear it.
Structural sound transmission is related to soundproofing, not sound reflection, but we want to briefly mention that placing an antivibration mat under your microphone will help to eliminate the sound vibrations coming through building structures and the floor of your studio.
The best method of dealing with structural noise transmission is decoupling. Decoupling means separation of the microphone from the vibration surface by placing vibration canceling materials like a rubber liner.
The antivibration floor mats from VocalBoothToGo are not only vibration canceling, but they also have a mass loaded soundproofing layer that allows blocking about 33 dB of sound coming through it.
To prevent structural noise from being recorded, place the Antivibration Floor Mats to decouple the microphone from the floor.
Some people ask if they can place Acoustic Blankets Producer’s Choice on the floor. Even though nobody can stop you from doing that, this would not be a proper use of the sound blankets. Besides getting dirty very quickly, they may be sliding on the hardwood floor and become a hazard. Please use blankets to cover walls in a studio or Floor mats for the floor, Sound baffles, and acoustic cloud panels for the ceiling.
So the ceiling normally is a huge flat open area, which is usually reflective (exceptions are the drop ceilings with acoustic panels in them).
So how to treat the reflections coming from the ceiling in the home recording studio?
Well, there are several options:
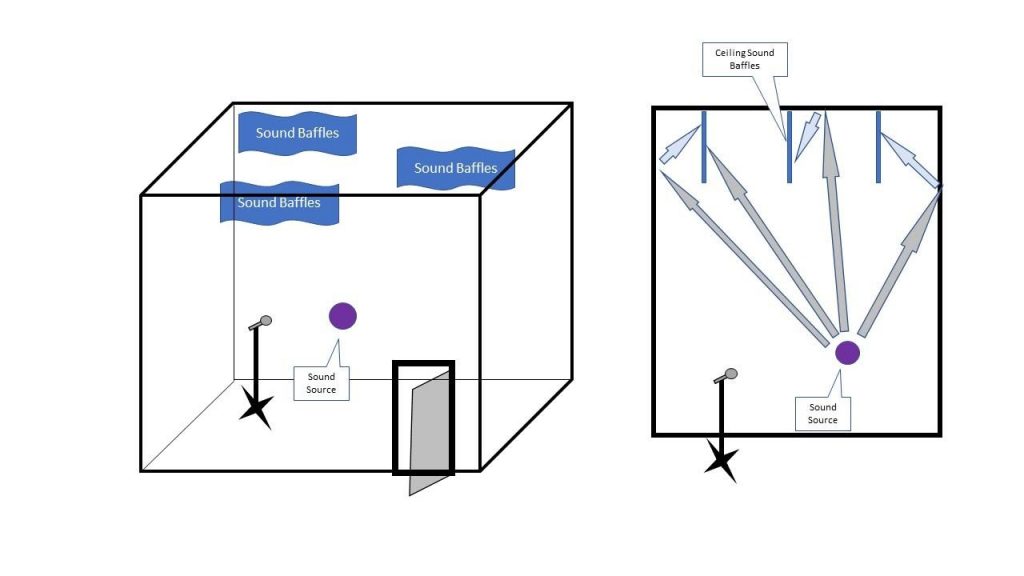
You can install ceiling baffles every few feet. Ceiling baffles are specially designed acoustic blankets that are suspended from the ceiling like flags or garlands.
Because the sound is omnidirectional, when it hits the ceiling it gets reflected at an angle and gets absorbed by the sound baffle or it may be absorbed BEFORE it reaches the ceiling:
So the way the ceiling sound baffle work in absorbing the reflections from the ceiling is they intercept the sound waves either before or after ( or before AND after) they hit the ceiling.
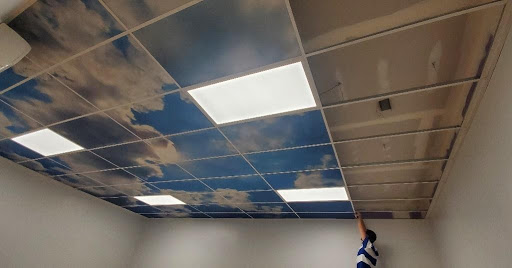
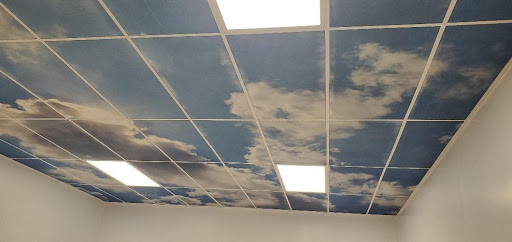
Another method of treating the ceiling in recording studios acoustically is by installing “sound clouds”.
Sound cloud is an acoustic panel that is suspended off of the ceiling. It can be built into the drop ceiling grid like this
But of course, it does not have to be that boring!
We can print actual clouds on it:
So you can install them for example in the drop down ceiling grid:
Although they look very real, they are not going to rain.
So now you treated the walls and the ceiling and everything seem to be good. But there is one more critical area that needs to be addressed in hour recording studio: low frequency sound waves.
Acoustic blankets and acoustic panels mostly absorb high and mid range frequency sound waves. Low frequency sound is very hard to deal with. You may hear it in your recording as “boomy”.
Well, there is no mystery in dealing with the low frequency absorption. the thicker your absorber the more low frequency they will absorb. To effectively deal with absorbing sound, the thickness of the sound absorption material needs to be ¼ of the wavelength it intended to absorb. For example, 6 inch thick absorber effectively absorbs all frequencies above the 565 Hz range.
(for the sticklers to details out there – the density of the absorbing material is also important: Density and thickness. Sound absorbing material has to be sufficiently dense to provide resistance to sound waves, yet not dense enough to become reflective. It also has to be porous, so the sound can get in in order to be absorbed ( and not reflected). In physics terms “Absorption” means the loss of sound energy while sound goes through a material. In fibrous panels sound energy gets spent on agitating the individual fibers, in porous materials like acoustic foam, sound energy gets spend by bouncing along the twisted acoustic foam channels.
Rule of thumb: the lowest frequency that will be effectively absorbed by a porous material has a wavelength of four (4) times the absorbent thickness. But this is a whole different article)
So how can you deal with the low frequency sound? Build some sound traps. As I mentioned above the thicker the absorber the lower frequency it will absorb. But where can you put a thick slab of sound absorption material in a small room? Stick it in the corner! In theory, because the low frequency sound waves are so long it does not matter where you put your bass trap. But because the corner is out of the way the best way to use it is to fill it with layers of sound absorption material. For broadband absorption, it makes sense to use sound absorption materials of different densities. For example, Rockwool or glass wool filler absorbs more of the lower frequency sound because rock fibers are heavier and it takes more energy to agitate them.
For example, in this studio: we built a corner bass trap by filling up the corner with a thick layer of Rockwool and then covering it with an acoustic panel so not it is both functional and aesthetically pleasing.
Cutting the corner also helps in reducing the possibility of standing waves, but if all walls are covered with sound absorption blankets, the standing waves should not be an issue.
So by now, you had eliminated the echo and reflections from your room. You are KILLING IT!
If you did it all right – your recording will sound great! Go on creating a killer sound now!
This part of setting up your home recording studio is known as acoustic room treatment. Now you can record beautiful sound without interference from echo, reverb, flatterer echo, and whatever else is bouncing off the walls.
But that is if you were living under a rock! Chance are you live in a city apartment where there are neighbors, traffic, and your own family members. How can you handle that?
So the next issue is the OUTSIDE NOISE!
Read next on HOW TO SOUNDPROOF YOUR HOME RECORDING STUDIO.
Additional Resources:
- How to hang Acoustic Blankets producer’s choice
- How to hang sound baffles, Acoustic ceiling tiles, and Acoustic Sound Cloud panels
- How to install ceiling track and wall track to create a Vocal Booth on tracks.
- How to build corner broadband bass traps using acoustic felt panels
- How to create a makeshift Vocal Booth using acoustic blankets and Flex Tee stands
- Need a quick portable vocal booth solution? Here are sound booth options for every situation.
- Out of the box recording studio solutions (Mobile and Portable Vocal booth options )